WX Translations |
Role: HR Administrator
Create Apex classes
These steps are required if you are using translations for WX Process names. If you are only using translations for WX Service names, go straight to WX Translations | Create and deploy Apex classes.
Creating and deploying Apex classes is an advanced procedure that should be carried out by a system administrator. For additional guidance, see the Salesforce help article: Salesforce: Manage Apex Classes.
The following steps must be performed in a Sandbox org connected to your production org. Two Apex classes will be created, one for identifying the static resource and holding the translation keys, and one to test the class.
Create the first class
-
Go to Setup. In Quick Find, enter Apex Classes. Open the Custom Code > Apex Classes page.
-
Select New.
NoteYou need to create two Apex Classes:
- One to identify the Static Resource holding the translation keys
- One test class
You can create new Apex Classes in Sandbox and Development orgs, not in Production orgs. To insert the Apex Classes in a Production org, create them in the associated Sandbox and then deploy to the Production org. Create the Apex Classes and then follow the instructions given below, following creation of the Apex Classes.
Sage People displays the Apex Class Edit page.
-
On the Apex Class tab, copy and paste this text:
Copyglobal class ApexClassName implements fHCM2.WXPackage {
global List<String> getTranslationKeys() {
String staticResourceName = 'Custom_Label_Translation_Keys';
List<String> labelNames = new List<String>();
try {
StaticResource sr = [SELECT body, name, NamespacePrefix FROM StaticResource WHERE Name =: staticResourceName LIMIT 1];
fHCM2.TranslationHelper.addLabels(labelNames, sr);
} catch (Exception ex) {System.debug('Failed to get translations for '+ staticResourceName +': ' + ex);
}
return labelNames;
}
}Replace these items in the text you copied above:
-
Replace
ApexClassNamewith a meaningful name for the Apex class of up to 40 characters, with no spaces.For example:
MyCompanyName_WXPackage -
Replace
Custom_Label_Translation_Keyswith the name of the static resource file you created.
-
-
Select Save.
Sage People displays the Apex Class Detail page for the new Apex Class.
-
Next, check that the class is using the same version of the Salesforce.com API as your production org:
Navigate to the Version Setting tab and review the version number for the Salesforce.com API.
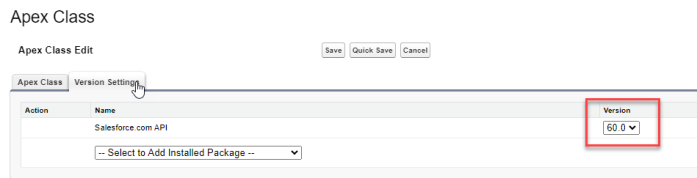
-
Check that the version number matches the API version in your production org. To check:
-
In the Production org, navigate to Setup > Integrations > API
-
Under Enterprise WSDL, select Generate Enterprise WSDL
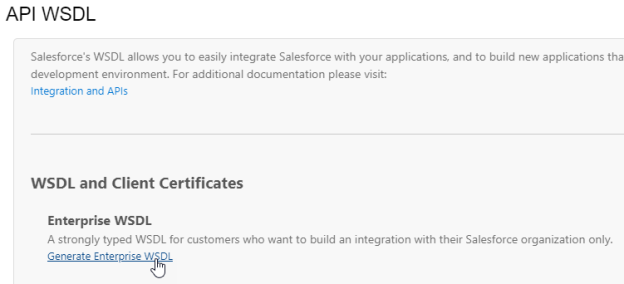
-
On the next page, select Generate.
-
An XML file is displayed in the browser. In the first line of the file, there will be an API Version number. Ensure the version matches the version of the Apex class in the Sandbox org. If they are different, navigate back to your Sandbox and from the picklist on Version Settings, select the appropriate version to match the production org. If the sandbox does not have the version that production is on available, a refresh of the sandbox will be needed.
-
Create a test class
-
Repeat the process to create a test class, entering the following code on the Apex Class tab:
Copy@isTest
public class ApexTestClass {
public static testmethod void testTranslations() {
ApexClassName p = new ApexClassName();
System.assert(p.getTranslationKeys().size() > 0);
}
}Replace these items in the text you copied above:
-
Replace
ApexTestClasswith a meaningful name for the test class of up to 40 characters, with no spaces.For example:
MyCompanyName_WXPackageTest -
Replace
ApexClassNamewith the name of the Apex Class you used for the main Apex Class you created in the previous step.
-
-
Select Save.
Sage People displays the Apex Class Detail page for the new Apex Test Class.
Deploy Apex classes to your production org
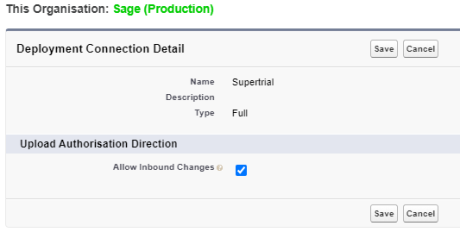
The production org must have the Sandbox defined as a connected org to enable it to receive the Change Set containing the Apex Classes. To check:
-
Navigate to Environments>Deploy>Deployment Settings. If you see a splash screen, select Continue.
If the Sandbox is allowed to upload changes to your production org, you will see an entry in the Upload Authorisation Direction column indicating whether changes are allowed from the Sandbox org:

-
If upload changes are not authorised, select Edit next to the Sandbox.
-
Select the Allow Inbound Changes checkbox.
-
Select Save.
When you are ready to deploy the Apex Classes into your production org, in the associated Sandbox org:
-
Go to Outbound Change Sets:
in Salesforce Lightning Experience, go to Setup > Platform Tools > Environments > Change Sets > Outbound Change Sets
in Salesforce Classic interface, go to Setup > App Setup > Deploy > Outbound Change Sets
- If a splash page is displayed, select Continue.
-
On the Outbound Change Sets page, in the Change Sets list, select New.
Sage People displays the New Change Set page.
- Enter a Name for the change set, for example WXPackage Apex Class, and an optional Description.
-
Select Save.
Sage People displays the Change Set page for your new Change Set.
- In the Change Set Components section, select Add.
- In Component Type select the picklist and choose Apex Class
- In the displayed list select the ApexClassName and the ApexTestClass you created earlier.
-
Select Add To Change Set.
Sage People adds the Apex Classes to the Change Set Components section of the Change Set page.
- In the Change Set Detail section, select Upload.
- Select the target Production org and select Upload.
- When upload completes, log in to the Production org.
-
Go to Inbound Change Sets:
in Salesforce Lightning Experience, go to Setup > Platform Tools > Environments > Change Sets > Inbound Change Sets
in Salesforce Classic interface, go to Setup > App Setup > Deploy > Inbound Change Sets
- If a splash page is displayed, select Continue.
- In the change sets awaiting deployment list, select the Change Set you created earlier.
- Select Deploy.
Register the Apex classes
Perform the following steps in the Production org to register the Apex Classes:
-
Open the Developer Console and go to Debug > Open Execute Anonymous Window.
-
In an empty window, enter:
CopyfHCM2.WXPackages.Register('ApexClassName', null, true);
fHCM2.WXPackages.SaveRegistered();Where:
ApexClassNameis as entered when creating the Apex Class.-
nullis:-
The namespace of your org. Production and Sandbox orgs do not have a namespace; enter
nullwith no enclosing quote marks. -
If you are working with a Developer org, enter the org namespace enclosed in quote marks, for example
'org_namespace'.
-
-
trueis:-
trueto overwrite existing settings. -
falseto add these settings to an existing setup.
-
-
Select Execute, and close the Developer Console.