You can create as many WX Services in Sage as you need for your organization, with each service containing all necessary processes. Usability, particularly on smaller screens, will likely put a practical limit on the number of services and processes you display.
Resolution
-
Select the WX Services tab.
-
On the WX Services Home page, select New.
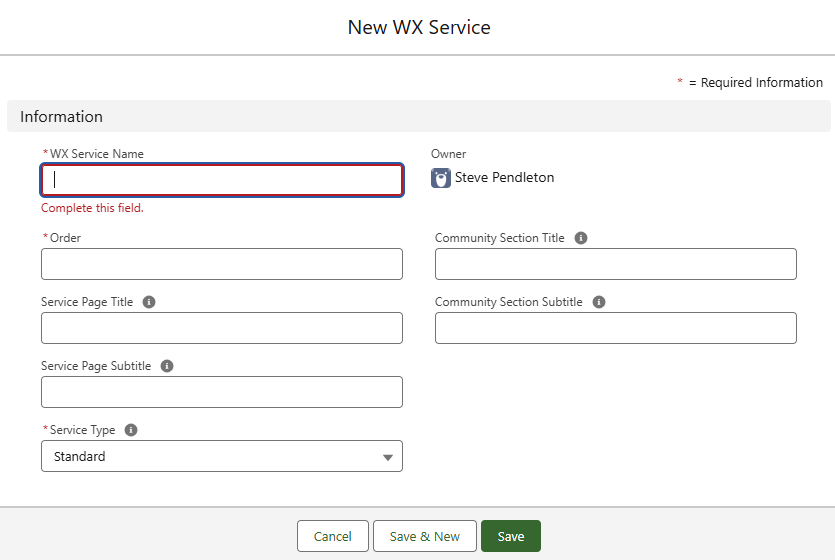
Sage People displays the New WX Service Edit page:
-
Complete the fields as follows:
Field What to enter WX Service Name The name you want to display in WX for this service, up to 80 characters.
Use a name summarizing the processes you're planning to group within it. Team Members use the Service names to navigate WX. Effective naming helps them find what they're looking for as quickly as possible.
If you're using translations for service names, enter the name of the Custom Label you've configured for this service. For example,
WX_Pay_and_Benefits. See WX Translations | Translating WX Service and Process names.Order Number, no decimal places, up to eight digits. The order in which you want this service to display in the WX menu. Lower numbered services display above higher numbered.
Tip Use a numbering scheme that makes it easy to change the order and add new services. For example, use 10, 20, 30 rather than 1, 2, 3.Service Page Title Used for personalized greetings. The default value for the greeting is Hi or the local language equivalent. This follows or precedes by the preferred name of the person viewing the page.
This field can display by default. See How to update the WX Service page layout.
Service Page Subtitle Use for Homepage services. The system uses the text you enter as a brief subtitle that appears under the page title. Leave empty for none.
This field can display by default. See How to update the WX Service page layout.
Community Section Title Use for Homepage services. The system uses the text you enter as a heading for the community updates section that displays summary processes. If empty, the system uses the default label "Community updates".
This field no longer displays by default. See How to update the WX Service page layout.
You can translate the title and subtitle in the same way as WX Service and Process names. See WX Translations | Translating WX Service and Process names.
Community Section Subtitle Use for Homepage services. The system uses text you enter as a brief subtitle that appears under the community updates section title. Leave empty for none.
This field can display by default. See How to update the WX Service page layout.
Service Type The type of service you want to create:
-
A Standard service appears as a menu item in WX and the system uses it to host WX processes. This is the default setting
-
A Profile service hosts supported WX processes for the team member's profile page. Profile services always appear directly beneath the Actions menu item. If you have more than one service set as a Profile, the system uses only the first ordered service as a profile. Further profile services appear as standard services
-
A Homepage service creates a landing page that hosts homepage components. This includes the Internal Communications carousel, time off summary, external links, and summary processes. Other types of process don't show. We recommend you set your Homepage to appear as the first item in the navigation menu by setting its order to "1". If you don't set a service as a Homepage, the system uses the first standard service by order as the default WX homepage. If you set more than one service as a Homepage, further homepage services appear later in the menu. this is beneath Actions, Profile, and My Team, according to their priority order
-
-
Select:
-
Save to save the Service and display the WX Service Detail page
-
Save & New to save this Service and create another
-
Cancel to discard this Service without saving and return to the WX Services Home page
-
-
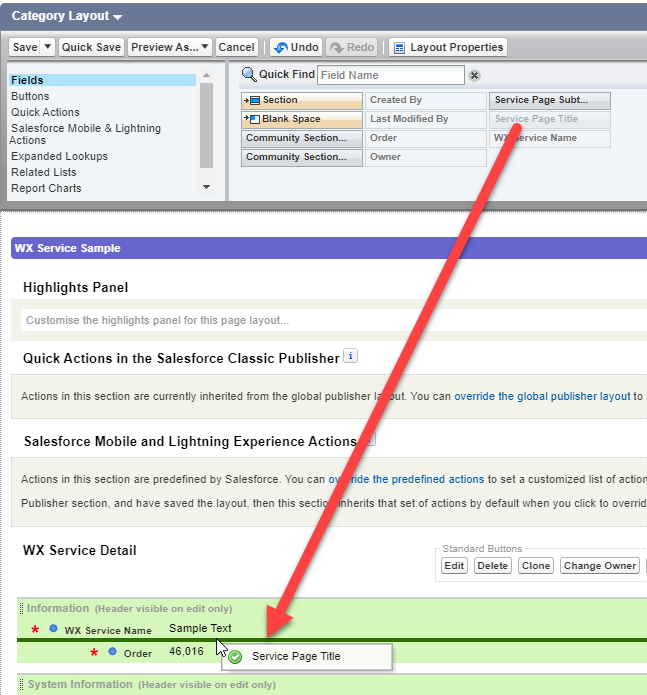
Go to Setup , and select the WX Service object.
-
Select Page Layouts.
-
Select the page layout you use for your WX services.
-
Select the Service Page Title field from the panel at the top of the page. Drag it to the WX Service Detail section.
-
Repeat the process to add the additional fields as you require:
-
Service Page Subtitle
-
Community Section Title
-
Community Section Subtitle
-
-
Select Save.
For more information about updating page layouts, see Page layouts, search layouts, related lists.