Timesheets | Setting up a timesheet pattern
A timesheet pattern defines the period covered by each timesheet, and the type of entry to request on timesheets— total time, start and end time, pay code, or work allocation. Each pattern has an associated overtime rule and can be assigned to:
A training module with some short videos on different aspects of timesheets, including Timesheet Patterns, is available in Sage University.
To set up a timesheet pattern:
-
Select the Timesheet Patterns tab.
Sage People displays the Timesheet Patterns Home page.
-
Select New.
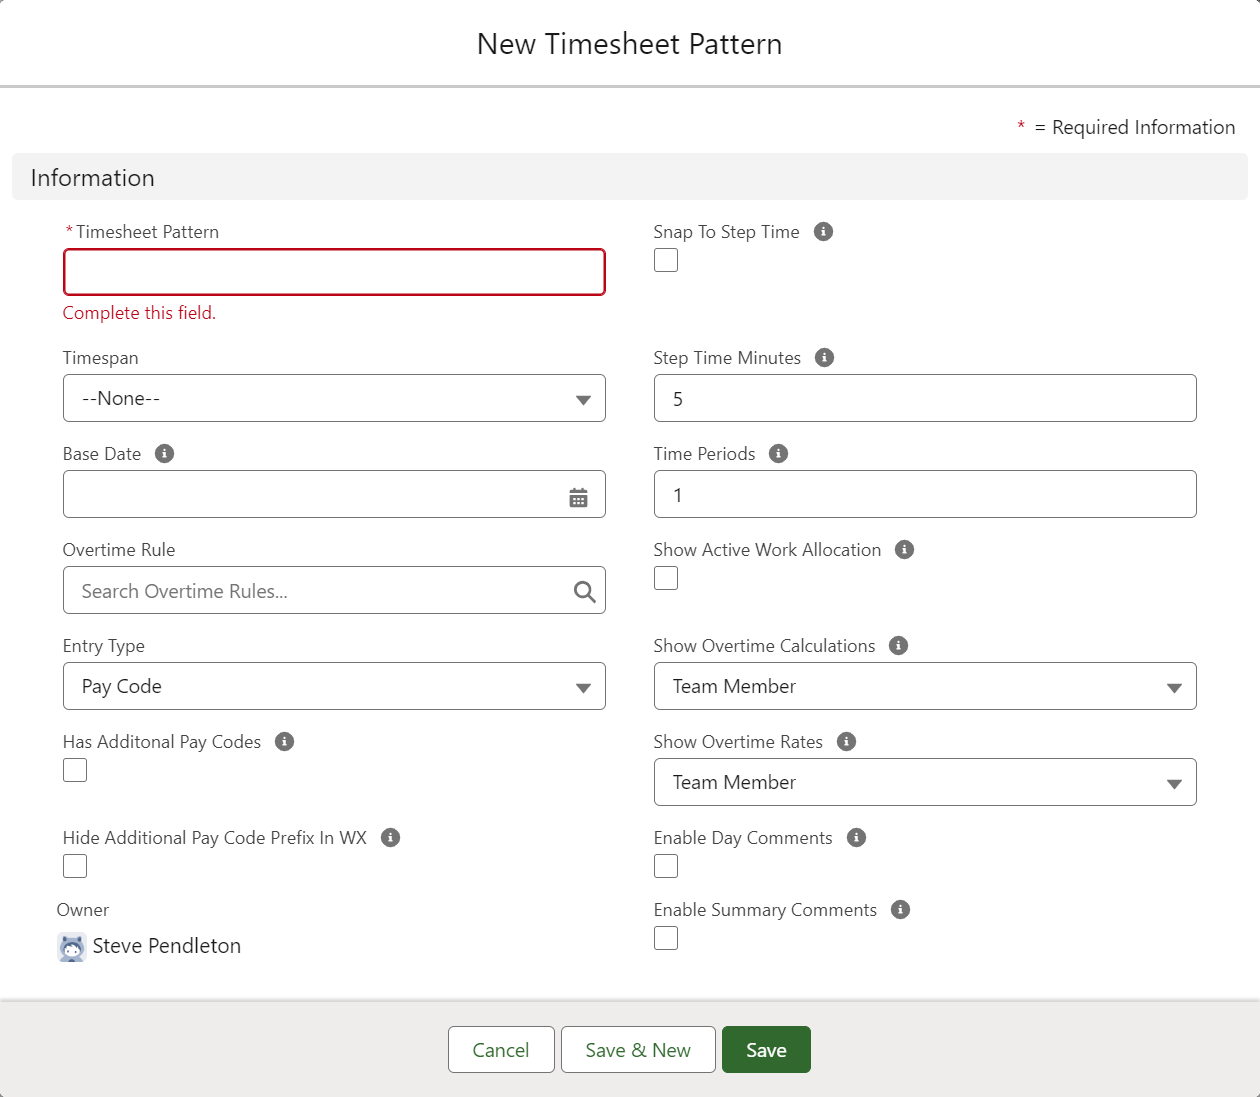
Sage People displays the New Timesheet Pattern screen:
-
Complete the fields as follows:
Field Description Timesheet Pattern The name for this timesheet pattern. Timespan The period covered by each timesheet based on this pattern.
Select the picklist and select from:
-
Week
-
Biweek
-
Semimonth
-
Month
Base Date A date in the past to act as the starting point for timesheets based on this pattern. Timesheet start dates are calculated to be a whole number of timespans after the Base Date, with the exception of the Semimonth timespan. Semimonths always start on the 1st and 16th of each calendar month, regardless of the Base Date.
Entry Type The type of entry to request on timesheets using this pattern. Select the picklist and select from:
-
Pay Code
The timesheet displays columns for each pay code hosted by the overtime rule associated with this pattern. Team members enter their time against pay code.
-
Total Time
The timesheet displays a column for the total time worked each day. Time is then automatically allocated to the pay codes hosted by the overtime rule associated with this pattern. Team members enter their total time.
-
Start-End Time
The timesheet displays entry fields for the start and end times for each period. Typically used for shift working. Use time periods to define the number of shifts you want to appear on timesheets based on this pattern.
-
Work Allocation
Work allocations can be assigned to team members by HR, or the timesheet can display selection boxes containing the active Work allocation hierarchy defined for this org. Team members can select from the available work allocations and then enter their time against each.
Layout The position of the calendar on the timesheet. Select the picklist and select from:
-
Left
Each day covered by the timesheet forms a row, with the pay codes, start-end times, or work allocations forming the columns.
-
Top
Each day covered by the timesheet forms a column, with the pay codes, start-end times, or work allocations forming the rows.
Overtime Rule The overtime rule containing the overtime conditions to be implemented for this timesheet pattern. You can use the same overtime rule for multiple timesheet patterns.
Select Overtime Rule lookup
 , find and select the overtime rule you want.
Snap Time Minutes For the Start-End Time entry type, the number of minutes between steps when entering time.
For example, if Step Time Minutes is set to 15, the start and end time boxes present picklists with the time in 15 minute segments: 00:00, 00:15, 00:30 and so on. Ignored when entry type is not Start-End Time.
Time Periods For the Start-End Time entry type, the maximum number of time periods per day available to add to and complete on timesheets.
For example, if you enter 2, the team member can add and complete a maximum of 2 time periods with start and end times on a timesheet:
Ignored when entry type is not Start-End Time.
Has Additional Pay Codes Checkbox. Indicates that overtime conditions associated with the overtime rule linked to this timesheet pattern have one or more additional pay codes.
Hide Additional Pay Code Prefix in WX Checkbox. Select if you are using additional pay codes and you want to WX display the name of the additional pay code only, without the "Oncall" prefix and flag.
Show Active Work Allocation Use when entry type is set to Work Allocation.
Checkbox. If checked, all active work allocations are available for selection and adding to the timesheet by the team member or manager.
If unchecked, the timesheet displays assigned work allocations only.
Show Overtime Calculations The lowest level able to view the overtime calculation results on the timesheet.
Picklist. Select from:
-
Team member
Can be viewed by all.
-
Manager
Can be viewed by manager or HR.
-
HR
Can be viewed by HR only.
Show Overtime Rules The lowest level able to view the overtime rates used to calculate overtime payments. Overtime rates can be displayed on timesheets if Show Overtime Calculations is also enabled.
Picklist. Select from:
-
Team member
Can be viewed by all.
-
Manager
Can be viewed by manager or HR.
-
HR
Can be viewed by HR only.
Enable Day Comments Checkbox. If checked, team members assigned to this timesheet pattern can add and edit comments for timesheet entries for each day in WX.
Enable Summary Comments Checkbox. If checked, team members assigned to this timesheet pattern can add and edit comments for complete timesheet periods in WX.
If a field is not displayed by default on the Timesheet Pattern Edit page you can add it to the page layout:
-
Go to Setup > Object Manager, and select Timesheet Pattern.
-
From the sidebar, select Page Layouts.
-
Select Edit for the Timesheet Pattern Layout.
-
Drag and drop the field onto the page layout.
-
Select Save.
-
-
Select:
-
Save to save the pattern and return to the Timesheet Pattern Detail page.
-
Save & New to save the pattern and enter another.
-
Cancel to discard your changes.
-

