Uploads are configured as part of inbound Payflow Services. Once configured, you can run the upload and use it as a means of loading data from any source system into Sage People; you do not have to use the upload exclusively for payroll data or as part of a fully configured payroll service.
To configure an upload:
- Select the Payflow Services tab.
Sage People displays the Payflow Services Home page.
-
If you want to configure an upload as part of an existing Payflow Service:
- Select a View that includes the service you want.
- Select the Payflow Service Name:

Sage People displays the Payflow Service Console for the Service.
-
If you want to configure an upload for use outside a Payflow service or as part of a new service:
- Select New.
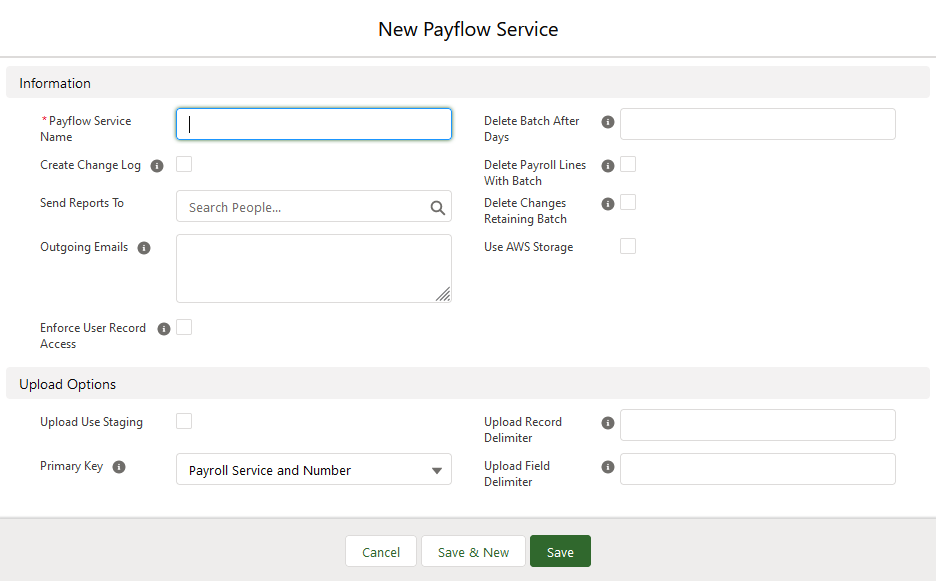
- In Payflow Service Name, enter a name for the Service.
- Check Create Change Log to add a log file to the Note & Attachments Related List for each batch run by the Service.
- In Send Reports To, enter the name of the Sage People user to receive upload reports. Use Lookup
 if necessary.
 - Select Save.
Sage People displays the Payflow Service Console.
- Select New.
- On the Payflow Service Console, Select Configure:
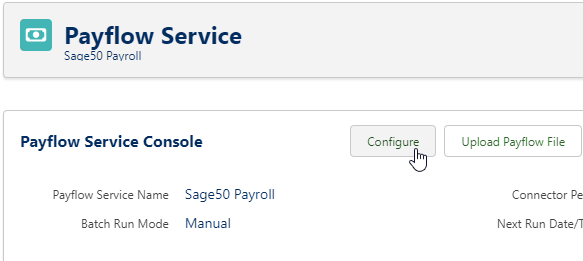
Sage People displays the Configure page for the Payflow Service.
- In the Mapping from Upload File to Payroll Lines section, select Upload Configure.
Sage People displays the Upload Configure page. Use this page to define key features of the uploaded file(s) so that the contents can be correctly mapped to Sage People records.
- Complete the fields in the Options section as follows:
Field
Description
Upload Use Staging
Checkbox. If checked, the upload uses the Inbound Staging Line object and not the Payroll Line Item object to map fields in the upload file to HCM fields.
You can use Staging for all Payflow uploads to HCM; you must use Staging for uploads to the Training object.
If unchecked, the upload uses Payroll Lines to map fields in the upload file to HCM fields.
Primary Key
Picklist. The key used to link a record in the upload file to a unique record in Sage People. Select the picklist and choose from:
- Unique ID
The Team Member's Unique ID as recorded in Sage People. This is the most commonly used option for single file uploads.
- Training Row ID
Used when uploading data to the Training object.
- Payroll Service and Number
If you are uploading data from more than one source (typically, multiple payroll services), use this option to avoid conflicts between instances of the same identification number used by more than one service.
Records in the upload file with Primary Key blank are ignored and not uploaded.
If the listed values are not present in the Primary Key picklist you can add them:
- Go to Setup > App Setup > Create > Objects and select the Label for Payflow Service.
- In the list of Custom Fields & Relationships, select the Field Label for Primary Key.
- In the Values Related List select New.
- Add the missing value(s) exactly as listed here, one per line.
- Select Save.
NoteThe primary key must be a Team Member's unique ID or a Salesforce record ID. It cannot be a different field in the record.
Payroll Line Item Key
Field name. The field in the upload file used to link to a Payroll Line.
Not used if Upload Use Staging is checked.
Payroll Line Item Code
Field name. The field in the upload file used to identify the record code for a Payroll Line Item. All upload records with the same code are allocated to the same Payroll Line Item.
Not used if Upload Use Staging is checked.
Upload Record Delimiter
Characters or a regular expression representing a break between records in the file(s) to be uploaded. Typically a return and line feed (\r\n).
If this field is blank the record delimiter defaults to a return and line feed.
Upload Field Delimiter
Characters representing a break between fields within a record. Typically a comma (,) or a tab (\t)
If you leave this field blank the field delimiter defaults to a comma to create a standard comma separated value (CSV) file, using the regular expression:
,(?=(?:[^\"]*\"[^\"]*\")*(?![^\"]*\"))
Fields containing commas are assumed to be enclosed in double quotes ("). Double quotes at the beginning and end of a field are stripped on import.
To use an alternative character as a delimiter, precede it with a backslash (\). For example, to use pipe (|) as a field delimiter, enter:
\|
Upload Use Field Numbers
Checkbox. Enables you to use sequential numbers as field names in the records to be uploaded.
If checked, the upload process expects to find sequential field numbers starting from 1 for all field names.
If unchecked, the upload process expects to find field names in the first record of the upload file. Multiple spaces embedded in field names are converted to single spaces, and case is ignored.
Upload Full File
Checkbox.
If checked, the complete upload file is scanned and compared with the previous upload run to identify Team Members missing from this upload. The confirmatory email sent on completing the run lists missing Team Members.
Missing Team Members are possible leavers or terminations; identifying them in the upload file provides a check and enables you to ensure that all required HR processes are followed.
If unchecked, no comparison of file content with the previous run is made.
Upload Post Employment Data
Checkbox.
If checked, data can be imported without creating new Employment Records for Team Members who have left.
Ensure Org Id in manifest Checkbox.
Optional, defaults to unchecked. If checked, the manifest file provider, typically a payroll provider, must include the Org ID of the target org in the file name and in column 1 of each Team Member record. The column heading must be Organization Id.
Work with the file provider to ensure the manifest file is correctly configured.
The Payroll Process will fail if the correct Org ID is missing from the filename, and any records without the correct Org ID will not be processed.
Use checksum in manifest file Checkbox.
Optional, defaults to unchecked. If checked, the manifest file provider, typically a payroll provider, must include a checksum for each Team Member record in the manifest file. The checksum must be calculated using the MD5 algorithm and encoded in Base64. The column heading must be Checksum.
Work with the file provider to ensure the manifest file is correctly configured.
Payflow validates the checksum provided in the manifest file for each record with a checksum calculated for each downloaded record file. If the 2 checksums agree, the record file is matched to a team member. If checksums do not agree the record file is deleted and an email is sent to Sage People Support.
Upload Attachment Filename
Picklist of fields in the Payroll Line object. Used to enable import of payslips to the Payroll Line object for display through WX.
Select the picklist and choose the Payroll Line field containing or referencing the name of the CSV file supplied by the payroll provider. The CSV file defines the content of the payslips upload.
When selected, an additional batch runs to import payslips after the batch importing data to Payroll Lines, and before the batch updating HCM objects.
Upload Configure Checkbox. If checked, Payflow will process multiple files for one team member if multiple files are included in the manifest file and link them to the team member’s employment record. If unchecked, Payflow will process the first file for a team member in the manifest file and ignore any further files for that team member. This option only applies to payslips and has no effect on any other kinds of records you can import with Payflow, such as training records. - Unique ID
-
Complete the fields in the Automatic Process section as follows:
Field Description Delete Batch After Days
Number of days after which Payflow batches are deleted.
For example, if set to 0 all previous batches for this service are deleted after the current one has run; only the latest batch is kept. If set to 7 all batches for this service over a week old are deleted.
Useful for constraining the amount of data held, and particularly valuable for managing changes only download data which can accumulate quickly.
Delete Payroll Lines With Batch
Checkbox. If checked, Payroll Lines linked to a batch are deleted when the batch is deleted. If not checked, deleting a batch does not delete associated Payroll Lines.
-
Complete the fields in the STFP section if you are uploading using managed file transfer when you are ready to test the data connection:
Field Description Incoming Server
The fully-qualified domain name of the Sage People SFTP file transfer platform from which the upload file will be retrieved. For example:
https://sftpgo.eu.sagepeople.com/
You must also add the user credentials for the SFTP service on the Payflow Configure page.
When cloning a Payflow service with an incoming server defined, to prevent unwanted data transfer, blank this field on the copy until you are ready to test the data connection.
Incoming Path
Enter the folder path on the SFTP server from which the upload file will be retrieved. This folder path must be unique per Payflow service.
When you save the upload configuration, Payflow will create this folder on the Sage People file transfer platform. We recommend that you use a folder name related to the purpose of the Payflow service, for example:
payslipsNo leading or trailing slash (/) is required.
Note that you cannot collect files from the root folder in the file transfer platform, so this field must have a value.
The third-party system must be configured to upload files to this folder.
- Select Save.
Sage People displays the Configure page for the Payflow service.