Create an entry for the report in the WX Reports tab. Use this entry to define the default settings for the report when it is displayed in WX.
You can use an existing Sage People or Salesforce report and display the report in its existing form, or further customize it for display to your managers or team members through WX.
- In the HR Manager Portal, select the WX Reports tab.
- On the WX Reports Home page, select New.
Sage People displays the New WX Report page:
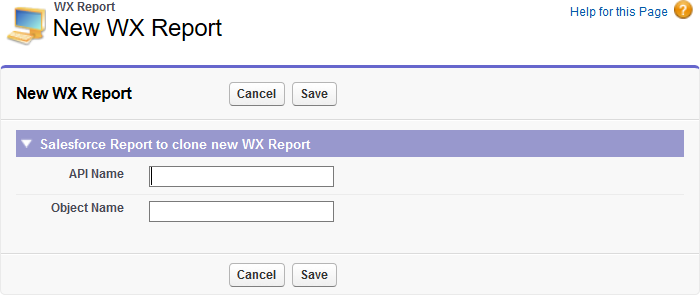
- Complete the fields as follows:
Field Description API Name
The API name of the report you entered as the Report Unique Name when saving the report. To find the Report Unique Name for a report you saved:
- Select the Reports tab.
- Select the folder hosting the Report.
- Select the Report Name.
- On the Report page, select Edit.
On the Report Preview page, select the drop-down arrow beside the Save button. Then select Report Properties.
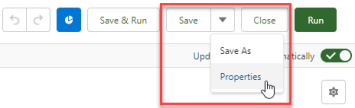
The Report Properties dialog displays the Report Unique Name for the report.
Object Name
Required for Custom Report Types.
The API Name of the lowest level object used to source the data. For example, for a custom report based on Team Member > Employment > Benefit enter:
fHCM2__Benefit__c
- Select Save.
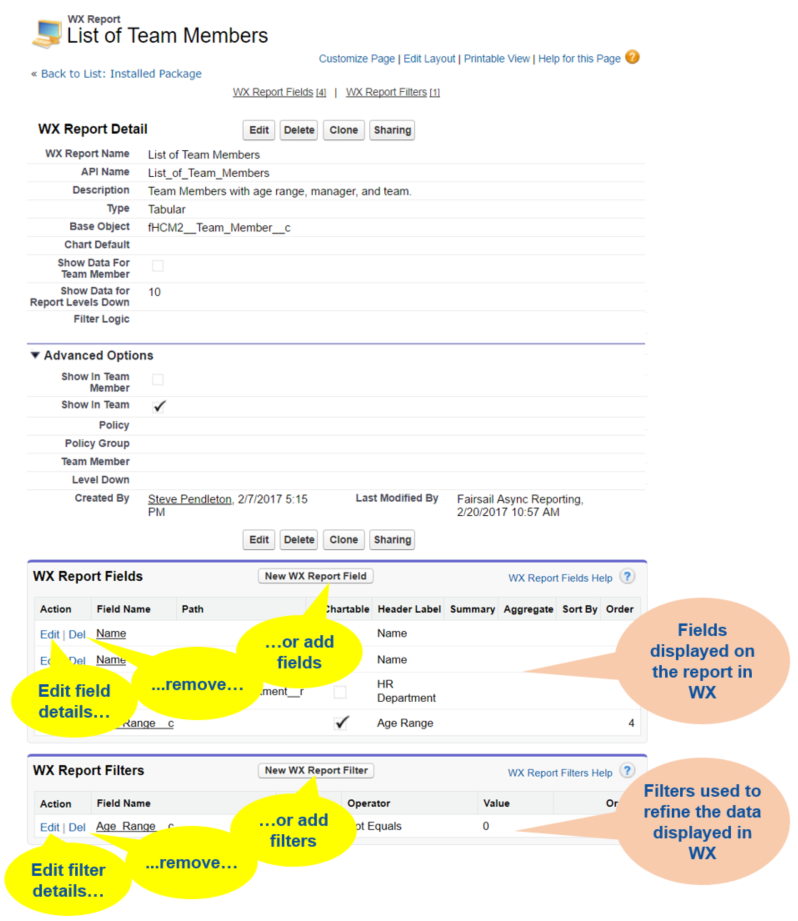
Sage People displays the WX Report Detail page for the Report:
To edit the WX Report:
- Select Edit.
Sage People displays the WX Report Edit page:
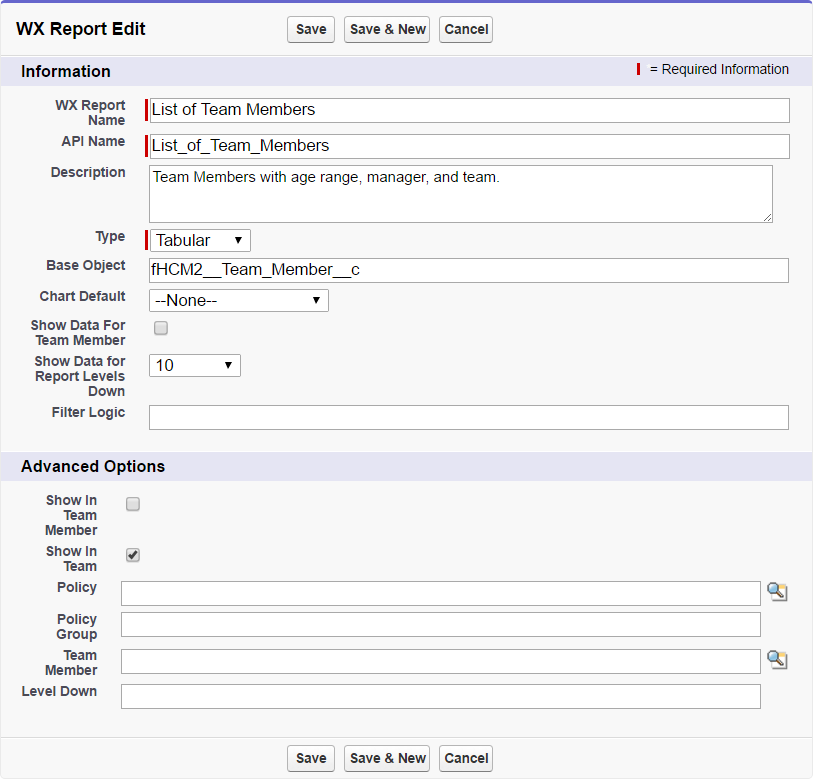
- Complete the fields in the Information section as follows:
Field
Description WX Report Name
The Report Name entered when saving the report. You can change the WX Report Name if you wish.
API Name
The Report Unique Name entered when saving the report. You can change the API Name to reference a different report but it must be a valid API Name for an existing report.
Description
The Report Description entered when saving the report. Edit the description if you wish.
Type
The Report Type, defined by the underlying report. One of:
- Tabular
- Summary
Base Object
The API Name of the lowest level object used to source the data.
There are some limitations on Base Object, imposed by the nature of the relationships between some objects:
- For WX Reports using data from Team Member, Employment Record, and Salary objects, set Base Object to fHCM2__Employment__c
- For WX Reports using data from Team Member, Employment, and Absence objects, set Base Object to fHCM2__Absence__c
Chart Default
Picklist. Select the picklist and choose the chart type you want to display by default when the report is selected for display in WX:
None
Defaults to Table.
Table
Line Chart
Vertical Bar Chart
Horizontal Bar Chart
Pie Chart
Doughnut
Radar Chart
If the report cannot be rendered using the Chart Default, the report is displayed in Table format.
Show Data For Team Member
Checkbox. If checked, the report includes data for the manager viewing the report.
Show Data for Report Levels Down
Picklist. The number of organizational reporting levels included in the report, below the manager viewing the report. A value from 0 to 10.
Note that this setting is not supported for reports that use the Job History object.
Filter Logic
The logical relationship between the filters listed in the WX Report Filters Related List on this page.
For example, for a report using multiple filters:
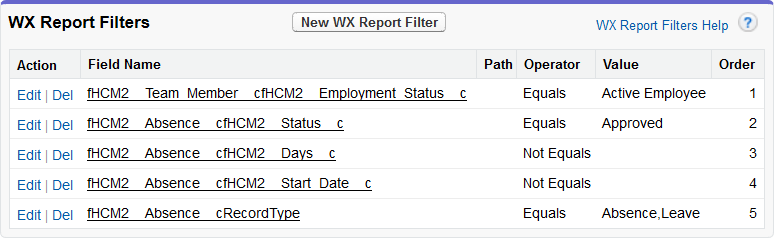
...Filter Logic might include:
1 AND 2 AND (3 OR 4) AND 5
where the numbers represent the value in the Order column in the Related List.
If Filter Logic is blank, AND is assumed.
-
Fields in the Advanced Options section control the visibility of the WX Report. Complete the fields as follows:
Field
Description Show In Team Member
Not used.
Show In Team
Not used.
Policy
Policy Name. To restrict visibility of this report to Team Members assigned to a single Policy, enter the Policy Name. Use Policy Lookup
 to find and select the Policy Name if necessary.
 Policy Group
Policy Group Name. To restrict visibility of this report to Team Members assigned to Policies in a specific Policy Group.
Team Member
Team Member Name. To restrict visibility of this report to a single Team Member, enter the Team Member Name. Use Team Member Lookup
to find and select the Team Member if necessary.Level Down
Number. Use with Team Member to restrict the visibility of this report to the Team Member and a number of organizational levels below the Team Member. For example, for named Team Member and their direct reports, enter 1.
Note that this setting is not supported for reports that use the Job History object.
-
Select
- Save to save your changes and return to the WX Report Detail page.
- Save and New to save your changes and return to the New WX Report page to define another WX Report.
- Cancel to discard your changes.
The WX Report Fields and WX Report Filters Related Lists enable you to change:
- The fields included in the WX Report.
- The filters applied to the data. Use the Filter Logic field to specify the relationship between the filters. If Filter Logic is blank, AND is assumed as the logical operator between all filters.
You can apply these changes to an existing report exclusively for display in WX - the underlying report remains unchanged.