Benefit Plans contain the details of the benefits made available to Team Members through Benefit Options. They can be full plans, such as those for health care or pensions, or a simple record of an available benefit such as a car allowance or a cell phone. Benefit Plans are provided by Benefit Suppliers, and much of the detail is typically provided by the suppliers following discussion and agreement with your organization.
A wide range of options for assessing eligibility is available. If you set more than one condition, all conditions must be met for eligibility. Many of the fields are not displayed by default and must be added to the page layout; if a field is described in the field description table and not displayed on screen, check the page layout and add the field.
You can create more than one version of a Benefit Plan - typically used to support price changes in a plan between enrollment periods. You can also set a start date for the Benefit Costs associated with a Plan, so if costs are the only element of a Plan that is changing, you can continue to use the same Plan with a new Benefit Cost table running from the date the costs change.
Before you can create a Benefit Plan, the Benefit Supplier hosting the plan must be available on the system. See Adding a new Benefit Supplier.
To add a new Benefit Plan:
- Select the Benefit Suppliers tab.
Sage People displays the Benefit Suppliers Home page.
- Select the name of the Benefit Supplier hosting the new Plan.
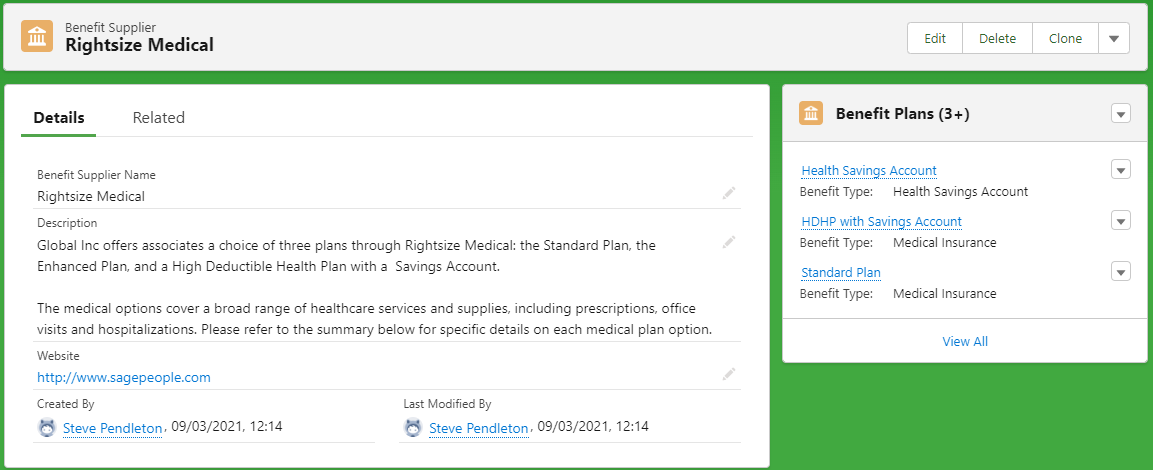
Sage People displays the Benefit Supplier Detail page, with all existing Benefit Plans available from that supplier displayed in the Benefit Plans related list:
- Select New Benefit Plan.
Sage People displays the Benefit Plan Edit page.
- Complete the fields in the Information section as follows:
Field
Description
Benefit Plan Name
The name by which the plan is known. By default the plan name is displayed to Team Members in WX when they work through the benefit selection process.
The plan name is also often included in Payflow files - avoid changing the name once set to avoid errors.
Cost Table
The name of another Benefit Plan with a Benefit Cost table you want to use for this Plan. If selected, the Benefit Costs from the nominated Plan are used and any Benefit Costs associated with this Plan are ignored.
Select Cost Table Lookup to select the Benefit Plan you want to supply the costs.
Benefit Supplier
The name of the supplier making this plan available. Defaults to the name of the Benefit Supplier you selected at the start of this procedure. If you need to change the supplier, select Benefit Supplier Lookup to find and select the correct supplier.
Version
A text label for this version of the plan. To easily distinguish between versions created for different enrollment periods, use a year as a version label.
Version is not displayed by default and must be added to the page layout.
Prior Plan
The Benefit Plan from the previous enrollment period used to set the values for this enrollment. Use in conjunction with Version when versioning Benefit Plans. Use Prior Plan Lookup to find and select the plan.
Prior Plan is not displayed by default and must be added to the page layout.
Description
A description of the plan. Displayed to Team Members through WX as Plan Details, and should contain enough information to enable a Team Member to select between plans.
Use the content editing tool bar to control the appearance of the description in WX. You can insert links and images if you want.

Website
The url for a site providing more information about the plan. This is often a page on the Benefit Supplier's website.
Enter the url in full starting with http:// or https://.
You can also include website links in the Description by selecting Link
 .
.Enrollment section
Enrollment Instructions
The instruction for Team Members wishing to enroll in this Benefit Plan. By default, instructions are displayed in WX.
Use the content editing tool bar to control the appearance of the instructions in WX. You can insert links and images if you want.
-
Complete the fields in the Benefit Field Values section as follows. These fields provide the detail for the benefit supplied by the benefit plan:
Field Description Benefit Type
Picklist. Select the Benefit Type to which this plan is linked. Benefit Types are the Record Types set up for the Benefit object and indicate the type of Benefit record created when this plan is selected by a Team Member.
Start First of Month
Checkbox.
If checked, Payflow checks the Start Date, and if Start Date is not the first of the month, the benefit start date is moved to the first day of the next month.
If unchecked, the benefit starts on the Start Date.
Deduction Code
The Benefit Deduction Code for this Benefit Plan. The Deduction Code is passed to your payroll system, typically for use on salary advice and internal finance documentation.
Policy Number
Text, up to 64 characters. An identifier for this Benefit Plan. Policy Numbers are typically allocated by suppliers.
-
Complete the fields in the Eligibility section as follows. These fields are not displayed by default: add an Eligibility section to your page layout to group eligibility fields. All conditions set must be met for a Team Member to qualify for this Benefit Plan.
Field Description Eligibility Calculation
The name of the Benefit Calculation used to establish if the primary beneficiary is eligible for this Benefit Plan. Enter the Benefit Calculation Name or use Eligibility Calculation Lookup to find and select the calculation.
Eligibility Value
The value or values that must be matched by the value returned by the Benefit Calculation named in Eligibility Calculation for the primary beneficiary to be eligible for this Benefit Plan.
Enter the value as a string, with multiple permitted values comma separated.
If the primary beneficiary is not eligible for the Plan, the Plan is removed from the hosting Benefit Set to prevent manual or automatic selection.
Age Determination Method
The date at which the primary beneficiary's age is assessed to determine eligibility for the Benefit Plan. Age can be used to check compliance with minimum or maximum age requirements and in rate tables.
Select the picklist and choose from:
- Start Date
The start date for the benefit as set for the benefit on the Team Member's Employment Record.
- Period Start Date From Start Date
The start date of the first Age Determination Period following the Benefit Start Date.
Set Age Determination Period and Age Determination Base Date values.
- Period End Date From Start Date
The end date of the first Age Determination Period following the Benefit Start Date.
Set Age Determination Period and Age Determination Base Date values.
- Effective Date
The benefit enrollment effective date at the time the benefit was selected.
- Period Start Date From Effective Date
The start date of the first Age Determination Period following the benefit enrollment effective date.
Set Age Determination Period and Age Determination Base Date values.
- Period End Date From Effective Date
The end date of the first Age Determination Period following the benefit enrollment effective date.
Set Age Determination Period and Age Determination Base Date values.
Age Determination Period
Used in conjunction with Age Determination Method Period dates. Select the picklist and choose from:
- None
- Yearly
- Monthly
- Semimonthly
- Biweekly
- Weekly
- Daily
Age Determination Base Date
The date used as a starting point to calculate start dates for Age Determination Periods.
Select the field to display a calendar. Select the date you want. Leave blank if you do not want to use automatic age determination.
Age Minimum
The youngest a person can be to be eligible for the Plan.
Age Maximum
The oldest a person can be to be eligible for the Plan.
Maximum Child Age
Number of years. The maximum permitted age of a child that can be covered under this Benefit Plan.
The Maximum Child Age field is not displayed by default and must be added to the page layout.
Service Determination Method
The date at which the primary beneficiary's length of service is assessed to determine eligibility for the Benefit Plan. Select the picklist and choose from:
- Start Date
The start date for the benefit as set for the benefit on the Team Member's Employment Record.
- Period Start Date From Start Date
The start date of the first Service Determination Period following the Benefit Start Date.
Set Service Determination Period and Service Determination Base Date values.
- Period End Date From Start Date
The end date of the first Service Determination Period following the Benefit Start Date.
Set Service Determination Period and Service Determination Base Date values.
- Effective Date
The benefit enrollment effective date at the time the benefit was selected.
- Period Start Date From Effective Date
The start date of the first Service Determination Period following the benefit enrollment effective date.
Set Service Determination Period and Service Determination Base Date values.
- Period End Date From Effective Date
The end date of the first Service Determination Period following the benefit enrollment effective date.
Set Service Determination Period and Service Determination Base Date values.
Service Determination Period
Used in conjunction with Service Determination Method Period dates. Select the picklist and choose from:
- None
- Yearly
- Monthly
- Semimonthly
- Biweekly
- Weekly
- Daily
Service Determination Base Date
The date used as a starting point to calculate start dates for Service Determination Periods.
Select the field to display a calendar. Select the date you want. Leave blank if you do not want to use automatic service determination.
Service Minimum Months
The minimum length of service in months required for the primary beneficiary to be eligible for the Plan.
Hours Worked Minimum
The minimum number of hours worked for the primary beneficiary to be eligible for the Plan. Hours worked is taken from the value entered in the Hours Worked field on the Employment Record.
- Start Date
-
Complete the fields in the Cover Dates section as follows. These fields are not displayed by default: add a Cover Dates section to your page layout to group cover date fields
Field Description Cover Period
The minimum period for which cover is available. Select the picklist and choose from:
- None
- Monthly
- Semimonthly
- Biweekly
- Weekly
- Daily
Cover Base Date
The date used as a starting point to calculate start dates for Cover Periods. Often set to coincide with the payroll base date.
Select the field to display a calendar. Select the date you want. Leave blank if you do not want to use automatic calculation of Cover Periods.
Cover Starting
The date used to set the start of cover. Select the picklist and choose from:
- None
- Effective Date
The benefit enrollment effective date at the time the benefit was selected.
- Start Date
The start date for the benefit as set for the benefit on the Team Member's Employment Record.
- Cover Period Start Date
The starting date for a specific cover period, chosen from the dates dictated by the Cover Base Date and the Cover Period. Use a past date to backdate cover, or a future date to ensure cover starts at the same time as a future cover period.
- Next Cover Period Start Date
The start date for the first cover period starting after today.
Cover Start Pre Offset Months
A number of months you want to add to the start date or effective date of the benefit to postpone the Cover Start Date. Can be used as well as Cover Start Pre Offset Days, in which case the months value is added before the days value.
If left blank, defaults to zero months offset.
Cover Start Pre Offset Days
A number of days you want to add to the start date or the effective date of the benefit to postpone the Cover Start Date. Can be used as well as Cover Start Pre Offset Months, in which case the months value is added before the days value.
If left blank, defaults to zero days offset.
Cover Start Post Offset Months
A number of months you want to add to the cover date after it has been calculated, to postpone the start of cover by an additional period. Can be used as well as Cover Start Post Offset Days, in which case the months value is added before the days value.
If left blank, defaults to zero months offset.
Cover Start Post Offset Days
A number of days you want to add to the cover date after it has been calculated, to postpone the start of cover by an additional period. Can be used as well as Cover Start Post Offset Months, in which case the months value is added before the days value.
If left blank, defaults to zero days offset.
Cover Ending
The date used to set the end of cover. Select the picklist and choose from:
- None
- Employment End Date
The End Date entered for the Team Member on their Employment Record.
- Cover Period End Date
The end date for a specific cover period, chosen from the dates dictated by the Cover Base Date and the Cover Period.
Start Date
A specific date when benefits using this plan are to start:
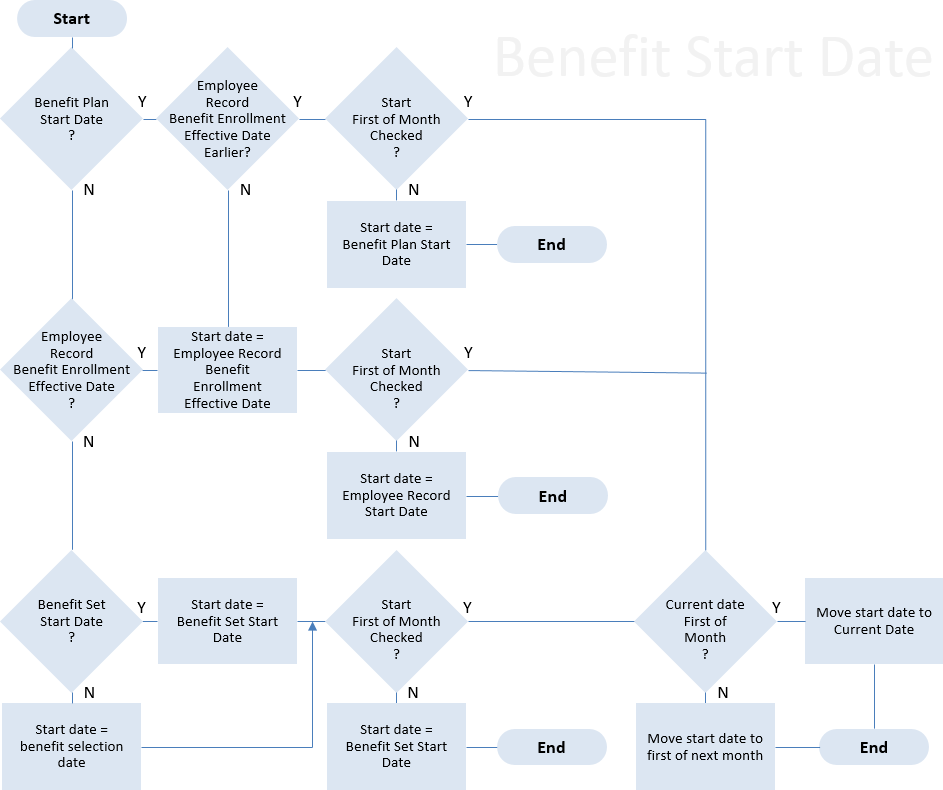
When specified, Start Date is used for all benefits using this plan selected by Team Members, except:
- For Team Members with an Employment Record Start Date that is later. In that case, the Employment Record Start Date is taken as the Start Date for the plan.
- When Start First of Month is checked. In that case, when Start Date is not the first of the month, the start date for all benefits based on this plan moves forward to the start of the next month.
When Start Date is blank, the start date for benefits using this plan is taken from:
- The Start Date for the Benefit Set.
- If Benefit Set Start Date is blank, the date the employee selects the benefit.
End Date
The date when the benefit is to end. If blank, the benefit ends on the end date of the Benefit Set hosting the Benefit Option linked to this Plan.
Deduction Start Date
The date when payments for the benefit are to start for Team Members.
If blank, Deduction Start Date is determined as follows:
- Use the Effective Date set for the Benefit Enrollment.
- If Effective Date is blank, use the Start Date from the Benefit Set.
- If Cover Starting is set for this Benefit Plan, use the Cover Starting value to modify the Deduction Start Date. For example, if Cover Starting is set to Cover Period Start Date, Deduction Start Date is set to the first available payroll date after the Cover Period Start Date.
- If Cover Starting is not set and Start First of Month is checked, Deduction Start Date is set to the first available payroll date after the first day of the next month, or if today is the first of the month, Deduction Start Date is set to the first available payroll date after today.
- If Cover Start Post Offset values are set, modify the Deduction Start Date to the first available payroll date after the offset cover start date.
- If Deduction Start Offset values are set, modify the Deduction Start Date to add the offset.
Deduction Start Offset Months
A number of months you want to add to the calculated benefit start date to set the start date for deductions to be made from the employee's salary. Can be:
- A positive value, to delay the start of deductions until after the benefit has started.
- A negative value, to make deductions before the benefit has started.
Can be used as well as Deduction Start Offset Days, in which case the months value is added before the days value.
If left blank, defaults to zero months offset.
Deduction Start Offset Days
A number of days you want to add to the calculated benefit start date to set the start date for deductions to be made from the employee's salary. Can be:
- A positive value, to delay the start of deductions until after the benefit has started.
- A negative value, to make deductions before the benefit has started.
Can be used as well as Deduction Start Offset Months, in which case the months value is added before the days value.
If left blank, defaults to zero days offset.
Deduction End Date
The date when payments for the benefit are to finish for Team Members.
If blank, deductions finish on the End Date for this Plan. If Plan End Date is blank, Deduction End Date is set to the End Date for the Benefit Set. If both Plan End Date and Set End Date are blank, Deduction End Date is left blank and deductions continue indefinitely.
Active
Checkbox. Can be set manually or by automated workflow.
If checked, benefit records created from this Plan are created as active.
If unchecked, benefit records created from this Plan are created as Inactive. Enables benefit records to be created and activated at a later date, typically on completion of a qualifying event such as a medical. Deductions for the Plan do not start until it is:
- Active
Active status is ignored for downloads if Benefit Select Active is unchecked when configuring the download.
AND
- Between the Start Date and End Date for the Plan.
AND
- Between the defined start and end dates for deductions.
If you are using Active On Submit, leave Active unchecked.
Active status is retained when benefits are recalculated by a batch or rolled over from a previous year.
Deductions Per Month
Picklist. The number of payroll deductions to be made each month for this Plan. Select the picklist and choose from:
- All Payrolls
Deductions are taken from every payroll made during the month. For biweekly payrolls this can be up to 3.
- 1, 2, 3, or 4
Deductions are made from the specified number of payrolls each month. If the number selected is less than the number of payrolls in the month, deductions are taken from the earlier payrolls, leaving those later in the month deduction free.
If left blank, Deductions Per Month defaults to All Payrolls.
Where a Plan specifies a cost for a period longer than the payroll period, the deductions are calculated by division. For example:
- An annual cost to be met from a biweekly payroll by deductions from All Payrolls:
The annual cost is divided by 26 to calculate the per-payroll deduction.
- An annual cost to be met by 2 payroll deductions per month:
The annual cost is divided by 24 to calculate the per-payroll deduction.
- A semi-annual cost to be met by 1 payroll deduction per month:
The semi-annual cost is divided by 6 to calculate the per-payroll deduction.
Active On Submit
Checkbox. Ensure Active is unchecked if you want to use Active On Submit.
If checked, and Active is unchecked, benefit records created from this Plan are not activated until submitted to HR. Submission can be:
- From WX when a Team Member selects the Plan and submits.
- When benefits are created using Create Default Benefit Set on the Benefit Set page.
- When benefits are created from a batch.
If unchecked, benefit records created from this Benefit Plan follow the setting of the Active checkbox.
-
Complete the fields in the Options section as follows:
Field Description Is Declined
Checkbox.
If checked, coverage for this Benefit Plan is not applied. Use Is Declined to define an option for a Team Member to waive a benefit. When selected by a Team Member, Sage People generates a benefit record enabling you to see that the benefit was waived.
Cost Selector Calculation
The name of the benefit calculation that determines which value to use from the cost table for this plan.
Cost Effective Date Method
Picklist. The method used to set the cost start date used for the Benefit Cost table. Select the picklist and choose from:
- Effective Date
- Cover Start Date
- Effective Date or Today If After
- Cover Start Date or Today If After
- Today
Has Open Beneficiary
Checkbox. If checked:
- Benefits can be selected without adding the beneficiaries of insurance cover.
- Beneficiaries can be edited at any time.
If beneficiaries are added or edited, the total of allocated benefit must always be 100%.
Has Life Cover
Checkbox.
If checked, the Benefit Plan supplies or requires life cover and the Team Member is prompted to specify the amount of life cover required.
If unchecked, the Team Member is not prompted to specify the amount of life cover required.
Life Cover Approval Method
Picklist. The method used to set the pre-approved amount of life cover. Select the picklist and choose from:
- Fixed Amount
Use the amount set by the Maximum Approved Life Calculation, or, if no calculation is specified, the amount given in Maximum Approved Life Cover.
If both Maximum Approved Life Calculation and Maximum Approved Life Cover are given, the Calculation is used and Maximum Approved Life Cover is ignored.
- Previous Amount
Use the amount set for the previous plan.
- Fixed Amount Then Previous Amount
For the first implementation of life cover under this Plan use the amount set as defined for the Fixed Amount option, then use that amount as the Previous amount for subsequent implementations.
Has Life Cover Additional
Checkbox.
If checked, the Benefit Plan supplies or requires additional life cover and the Team Member is prompted to specify the amount of additional life cover.
If unchecked, the Team Member is not prompted to specify an amount of additional life cover.
Maximum Approved Life Cover
The maximum financial amount of life cover available under this Benefit Plan.
Used with a validation rule to restrict the maximum amount of cover an employee can request without evidence.
Maximum Approved Life Calculation
The name of the Benefit Calculation used to provide the value of Maximum Approved Life Cover for this Benefit Plan. Enter the Benefit Calculation Name or use Maximum Approved Life Calculation Lookup
 to find and select the calculation.
Maximum Additional Life Cover
The additional financial amount of life cover an employee can request on top of the Maximum Approved Life Cover if evidence is supplied.
Used with a validation rule to restrict the overall total permitted amount of life cover an employee can request:
Maximum Approved Life Cover + Maximum Additional Life Cover.
Maximum Additional Life Calculation
The name of the Benefit Calculation used to provide the value of Maximum Additional Life Cover for this Benefit Plan. Enter the Benefit Calculation Name or use Maximum Additional Life Calculation Lookup to find and select the calculation.
Cost Per
The unit used to express the cost of the benefit. For example, if the benefit costs $2 for every $1000 of coverage, set Cost Per to $1000.
Has Beneficiaries
Checkbox.
If checked, the Team Member is prompted to supply a list a list of beneficiaries for this Benefit Plan. It is not mandatory to enter beneficiaries.
If checked and the Benefit Plan is created automatically, it is created without beneficiaries.
If unchecked, the Team Member is not prompted for beneficiary names.
Has Percentage Contribution
Checkbox.
If checked, the Team Member is asked for a percentage of salary contribution for this Benefit Plan.
If unchecked, the Team Member is not asked for a percentage of salary contribution.
Maximum Percentage Contribution
The maximum percentage-of-salary contribution from Team Members for this Benefit Plan.
Maximum Employer Percentage Contribution
The maximum percentage-of-salary contribution from Employers for this Benefit Plan.
Employer Match
Percentage. The employer's 401K plan contribution as a percentage of the employee's contribution. Use Employer Match Limit to provide a maximum value.
Employer Match Limit
Percentage. The maximum the employer will contribute to the employee's 401K plan as a percentage of the employee's salary. Acts as a cap to the Employer Match value.
For example, an employer matching 50% of an employee's contributions for the first 8% of salary contributed by the employee:
- Set Employer Match = 50
- Set Employer Match Limit = 8
The employer contributes a maximum of 4% of the employee's salary, regardless of the level of the employee's contribution.
Has Savings Plan
Checkbox.
If checked, the Team member is prompted for the amount they wish to save per payroll period in this Benefit Plan. The amount is multiplied by the number of payroll periods in the current year and the total amount to be saved over the year is displayed.
If checked, Savings Plan Entry Method must be set to a non-blank value.
If checked, and Savings Plan Enter Annual Amount is also checked, the Team member is prompted for the amount they wish to save during the current year.
If unchecked, the Team member is not asked for a savings plan amount.
Savings Plan Enter Annual Amount
Checkbox. Works in conjunction with Has Savings Plan. Has Savings Plan must be checked for Savings Plan Enter Annual Amount to have any effect.
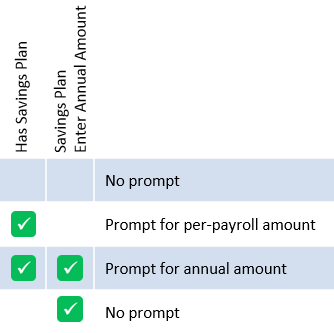
If checked, and Has Savings Plan is also checked, the Team Member is prompted for the amount they wish to save during the current year in this Benefit Plan. The amount entered by the Team Member is used to calculate the amount to be deducted from each payroll, using the value given in Deductions Per Month for this Plan. The per-payroll deduction is displayed
Where the calculation results in a fraction of a currency unit for each deduction, the total amount is rounded down to the nearest value enabling whole units. For example, an entered annual amount of $5000 to be deducted from 26 biweekly payrolls is rounded down to deduct 26 amounts of $192.30 to give an annual savings amount of $4999.80.
If the Plan is selected and an annual amount entered part way through a year, the per-payroll deduction is calculated on the number of payrolls left in the year.
If unchecked, and Has Savings Plan is checked, the Team member is prompted for the per-payroll amount. If both are unchecked, the Team member is not asked for a savings plan amount.
Savings Plan Entry Method
Picklist. The method used to set the amount to be saved into the savings plan. Values are converted into amounts per pay period, taking into account the value set for Deductions Per Month.
If Has Savings Plan is checked, Savings Plan Entry Method must be set to a non-blank value or an error message is generated.
Select the picklist and choose from:
- Pay Period
The Plan uses the savings amount as the amount to be deducted per Pay Period.
- Monthly
The Plan uses the savings amount as the amount to be deducted per month. Sage People converts the amount into an amount per Pay Period so that deductions can be made from pay checks. The value set for Deductions Per Month is included in the calculation. Fractional values are rounded down so that the specified amount is not exceeded.
- Yearly
The Plan uses the savings amount as the amount to be deducted annually. Sage People converts the amount into an amount per Pay Period so that deductions can be made from pay checks. The value set for Deductions Per Month is included in the calculation. Fractional values are rounded down so that the specified amount is not exceeded.
-
Complete the fields in the Enrollment section as follows:
Field Description Enrollment Instructions
The instruction for Team Members wishing to enroll in this Benefit Plan. By default, instructions are displayed in WX.
Use the content editing tool bar to control the appearance of the instructions in WX. You can insert links and images if you want.
-
Select:
- Save to save the Benefit Plan details.
Sage People displays the Benefit Plan Detail page ready for you to add further details for this plan such as benefit costs and calculations.
- Save & New to save the Benefit Plan details and display another Benefit Plan Edit page.
- Cancel to discard your changes and return to the Benefit Supplier Detail page.
Completed Benefit Plans can be cloned using export and import options.