Plans are defined through the HR Manager portal, then made available to Planners through WX.
- Select the Compensation Planning tab.
-
Select New.
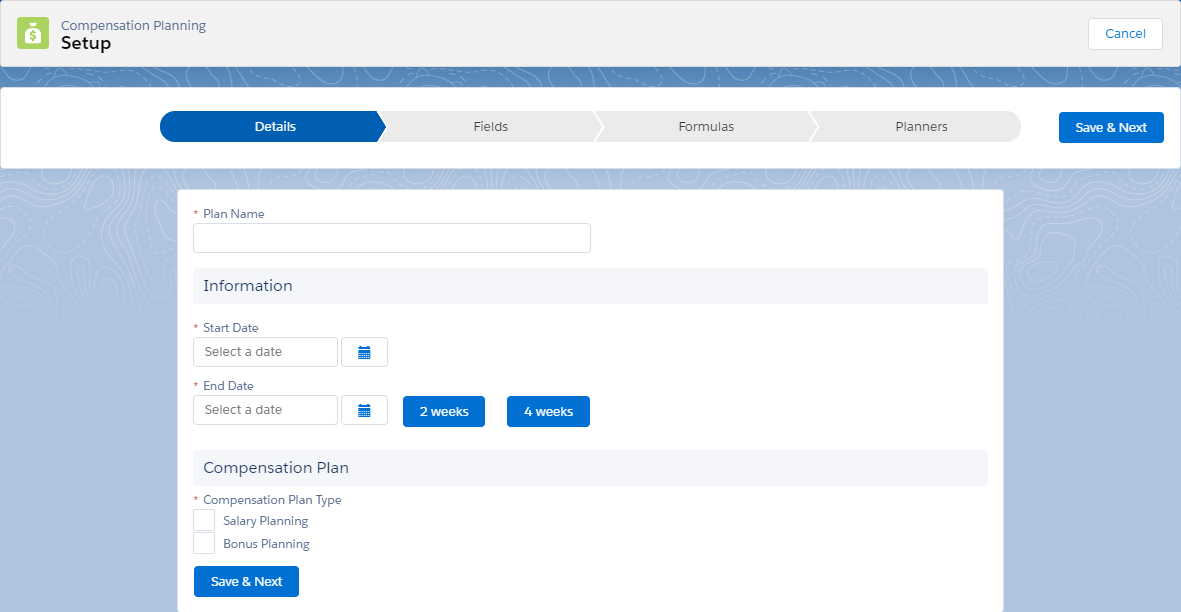
Sage People displays the Compensation Plan setup page:
-
Complete the fields as follows:
Field What to enter Plan Name The name of the Plan. -
Complete the fields in the Information section as follows:
Field What to enter Start Date The date when the Plan starts. End Date Offset A default two or four week period when the Planner must complete the Plan. If you select an offset, End Date is automatically populated. End Date A date in the future and after Start Date. -
Complete the fields in the Compensation Planning section as follows:
Field What to enter Compensation Plan Type The type of Plan. Select:
- Salary Planning to create a plan for salaries
- Bonus Planning to create a plan for bonus awards
- Both checkboxes to create a combined salary and bonus plan.
Additional fields appear depending on your selection.
-
If you selected Salary Planning as the Compensation Plan Type, Sage People displays the Salary Planning section. Complete the fields in as follows:
Field
What to enter Effective Date The default date when awards in the Plan come into effect. To enable Planners to change the Effective Date for individual Team Members, select the Allow Planners to edit effective date in Planning Worksheet checkbox.
Allow Planners to edit effective date in Planning Worksheet Checkbox. Select if you want managers who complete Salary Plans to be able to change the default Salary Effective Date for individual Team Members.
Salary Reason Picklist. Select the picklist and choose the reason to apply as a default to Team Members in the Plan. The picklist includes all active values held in the Change Reason field on the Salary object.
To display the default Salary Reason in the Plan and to enable Planners to change the Salary Reason for individual Team Members, select the Allow Planners to edit the salary change reason in Planning Worksheet checkbox.
If Salary Reason is left blank, no default Salary Reason is displayed in the Plan. If Planners leave the field blank in the Plan, Salary Records default to display the content of the Custom Label Change_Reason_Compensation_Planning. To enable Planners to select a Reason when no default is set, you must select the Allow Planners to edit the salary change reason in Planning Worksheet checkbox.
Allow Planners to edit the salary change reason in Planning Worksheet Checkbox. Select:
- If you have set a default reason and you want Planners to view and change the default Salary Reason for individual Team Members.
- If you have not set a default reason and you want Planners to select a Salary Reason for each Team Member.
-
If you selected Bonus Planning as the Compensation Plan Type, Sage People displays the Bonus Planning section. Complete the fields in as follows:
Field
What to enter Effective Date The date when awards in the Plan come into effect.
Allow Planners to edit effective date in Planning Worksheet Select if you want to enable managers who complete Bonus Plans to change the default Bonus Effective Date.
Bonus Reason Select the reason to apply to bonus payments made as a result of the Bonus Plan.
The reasons available are defined in the Reason picklist on the Bonus object.
-
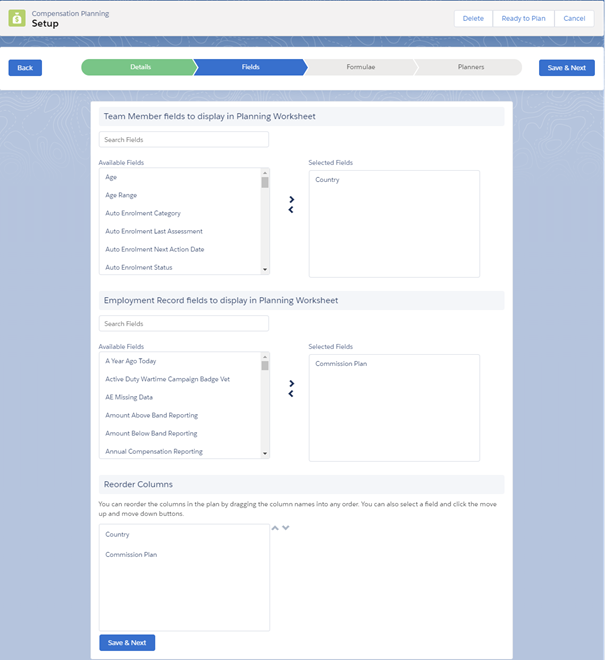
Select Save & Next to display the Fields tab:
-
Add fields on the Select Fields page to provide Planners with more information. If the default fields are sufficient you do not need to add any more. See Default Plan display in WX.
Fields available to add to a Plan are selected from the Team Member and Employment Record objects to provide information commonly used when planning compensation awards - not all fields in those objects are listed for selection.
- Use Search Fields in each section to find fields you want to add to the Plan.
- Select a field in Available Fields and use the right arrow to add it to Selected Fields.
- Select a field in Selected Fields and use the left arrow to return it to Available Fields.
- Select a field in the Reorder Columns section and use the up and down arrows to specify the order in which it is displayed in the Plan. Note
Any fields removed from the Team Member or Employment Record objects while you were building the Plan are listed in a message. Move the missing fields from Selected Fields to Available Fields and select Save & Next again. The missing fields are removed from Available Fields automatically.
-
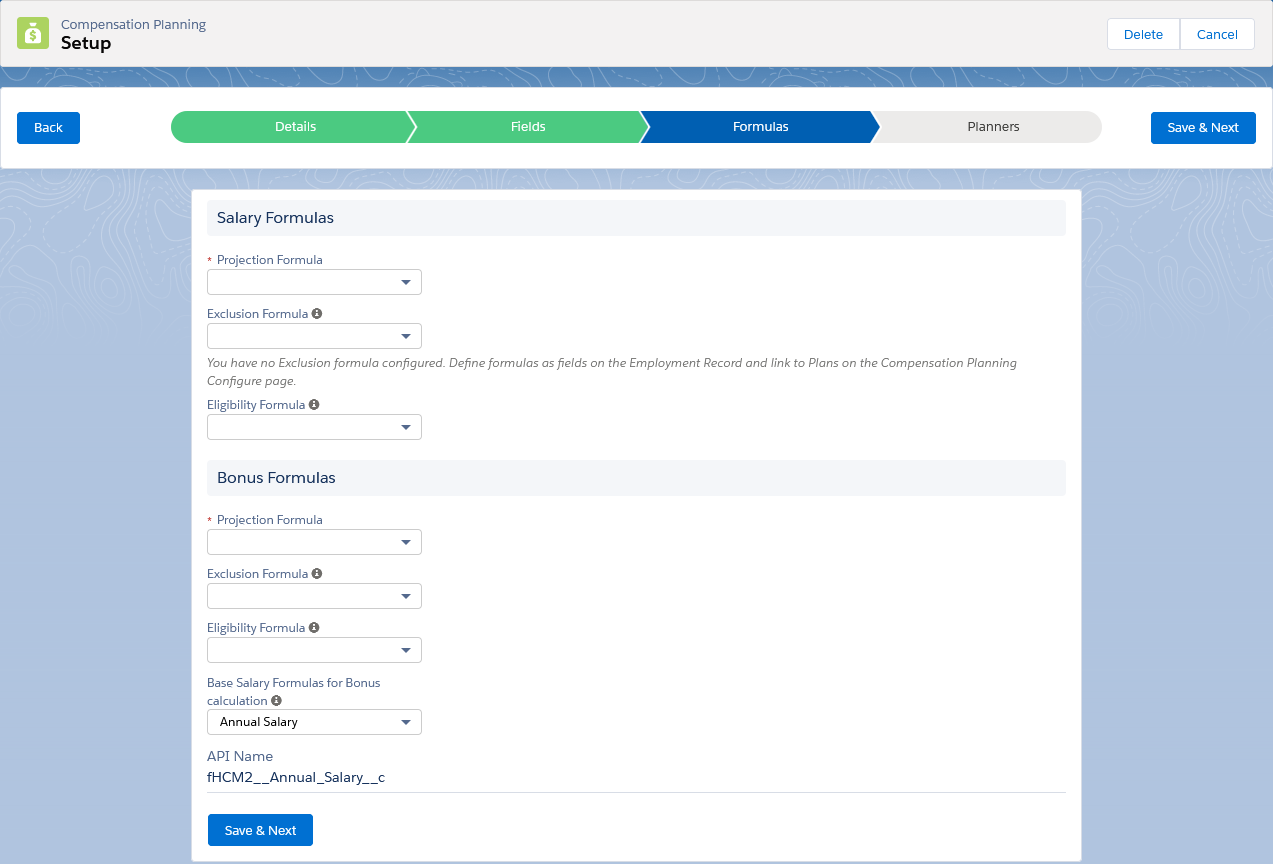
Select Save & Next to display the Formulas tab:
-
Select the formulas you want to use:
- If you selected Salary Planning as the Plan type, select from the Salary Formulas picklists.
- If you selected Bonus Planning as the Plan type, select from the Bonus Formulas picklists.
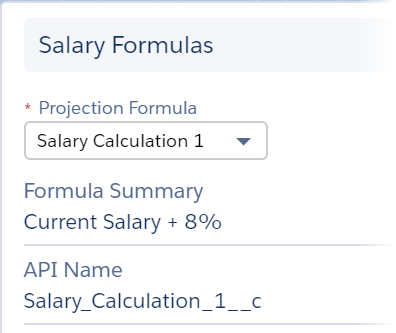
When you select a formula the page expands to display the Formula Summary and the API Name of the Formula field:
The Formula Summary contains the Help Text loaded for the Formula field.
NoteAny formulas removed from the Employment Record while you were building the Plan are listed in a message. Ensure the formula has been removed from the Compensation Planning Configure page. Then go to the Formulas tab, select an alternative formula, and select Save & Next again.
-
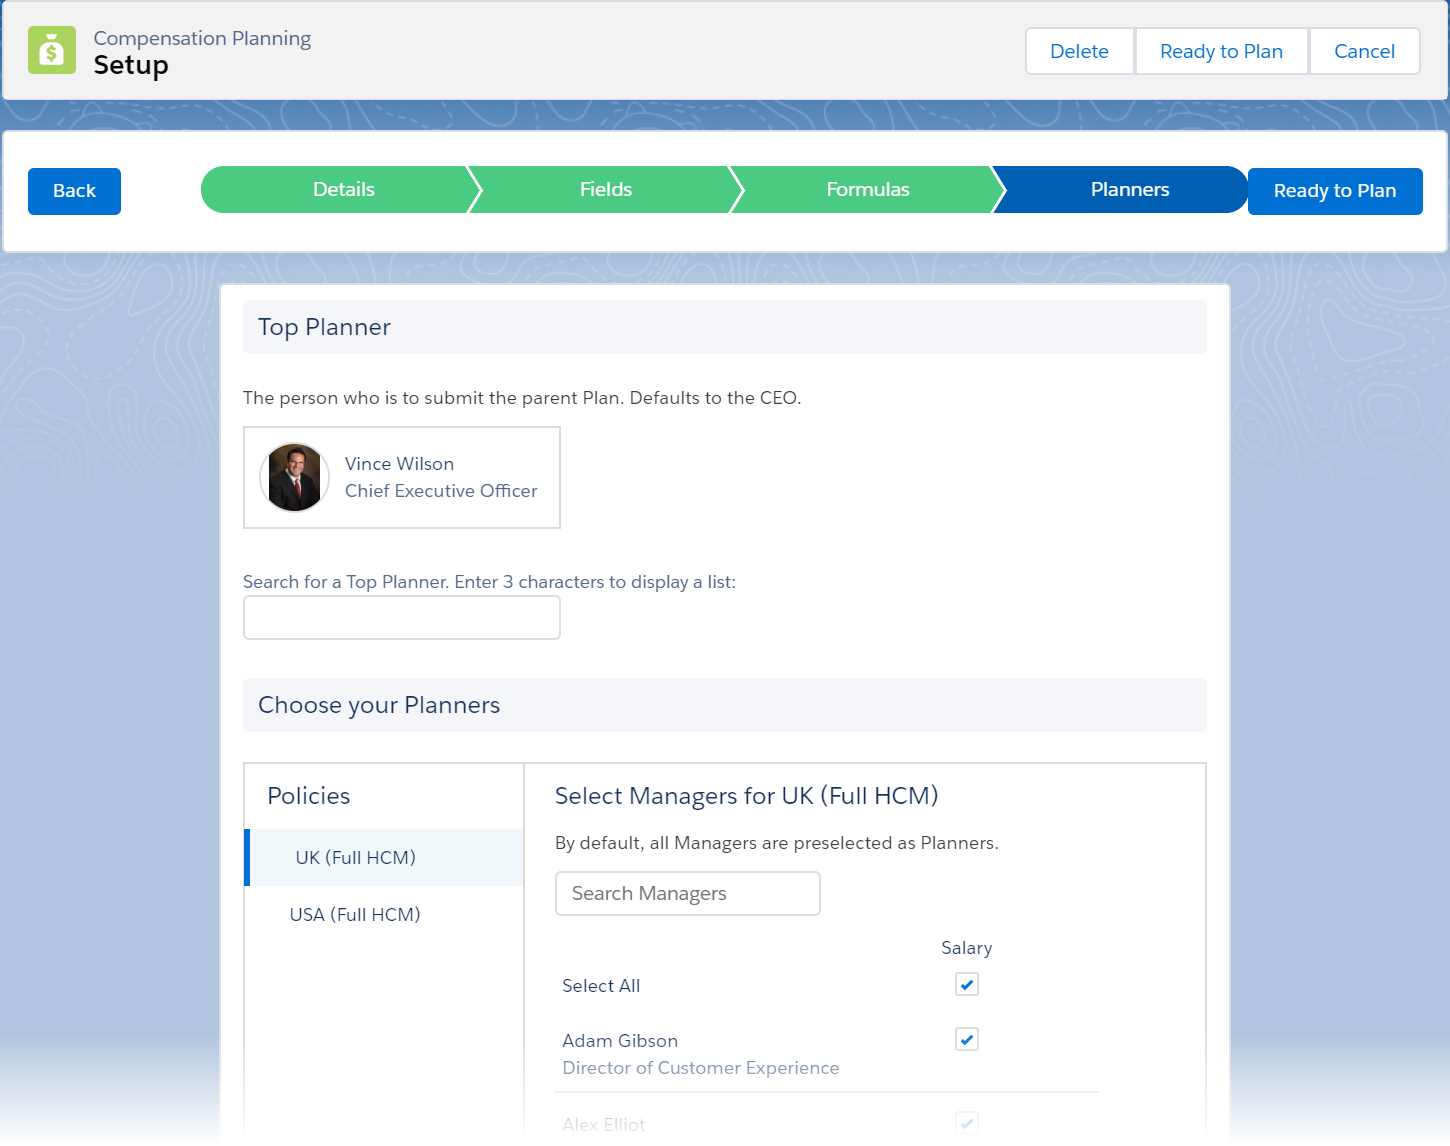
Select Save & Next to display the Planners tab:
-
Select a Top Planner for the Plan. The Top Planner defaults to the CEO of your organization and is the person who submits the main Plan.
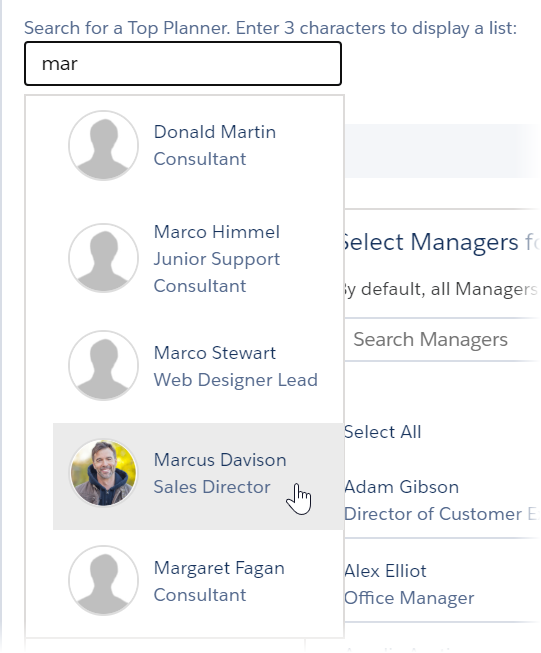
Start typing the name of the Top Planner in the Search field to display a list of matching names, then select the person you want:
Type at least three characters to start the search.
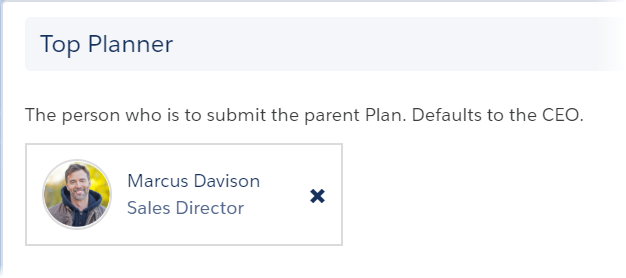
The person you chose replaces the previous Top Planner:
Change the Top Planner as many times as needed until you are ready to plan.
-
Select Planners for the Plan. A Planner is a Manager with one or more direct reports. Planners are displayed by Policy and the Planners tab automatically includes all Policies with Managers assigned - if a Policy has no Managers it is not included in the list of Policies.
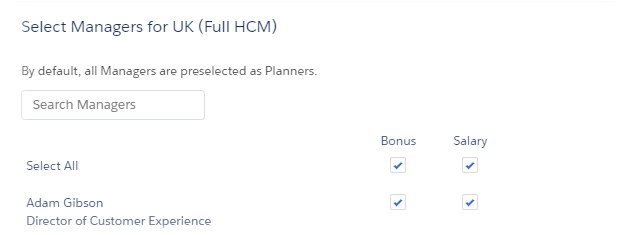
Planners are displayed with checkboxes corresponding to the type of Plan. A Plan including Bonus and Salary displays two columns of checkboxes:
Select a policy to display all managers assigned to the Policy. By default, all Managers with Employment Status set to Active and Has Left showing False are selected as Planners.
If you want to mix Planner responsibilities - for example some Planners contributing just Salary recommendations, some contributing just bonus, some contributing both salary and bonus - create two Plans, one for salary, one for bonus.
If you are creating a Plan for just a few Planners you can deselect all Planners by unchecking the Select All checkboxes at the head of the column, then:
- Use the Search field to find a specific manager.
- Select the Bonus, Salary, or both checkboxes next to a manager to make them a Planner for the type of Plan.
If you are creating a Plan for most managers to use and want to remove just a few:
- Use the Search field to find a specific manager.
- Clear the Bonus, Salary, or both checkboxes next to a manager to remove them as a Planner for the type of Plan.
If a Planner leaves during the planning setup process, when Ready to Plan is selected Sage People displays a notification message and the Planner must be removed manually from the list of Selected Managers. If a replacement manager is not immediately appointed for the leaver's direct reports, the leaver's immediate manager is automatically assigned as the Planner for the leaver's direct reports.
- Check your Plan. You can select the tabs or Back to return to a page and make any required changes.
-
When you are happy with your Plan, select Ready to Plan
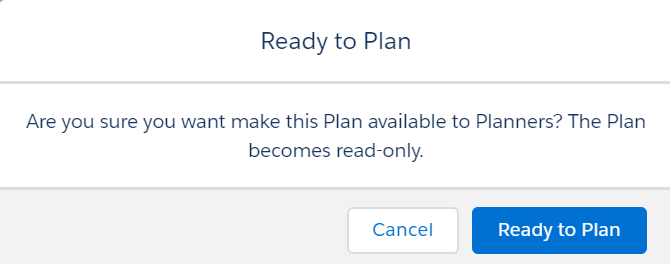
Compensation Planning asks you to confirm:
-
Select Ready to Plan.
Compensation Planning performs several checks:
- There is only one Team Member without a manager, with Employment Status set to Active and Has Left showing False. This is typically the CEO, the person at the top of the corporate hierarchy.
- All active Team Members with a manager have a Current Salary. The CEO can have, but does not need, a Current Salary.
- All Current Salary values have an associated currency.
- The org has only one exchange rate with Rate set to 1.00 to determine the reporting currency.
When all checks are successful, two batches are triggered:
Ready to Plan batches
- The Ready Plans batch sets the Plan status to Ready.
- The Start Plans batch runs at the time selected on the Compensation Planning Configure page, or when the Ready Plans batch finishes and the Plan Start Date is today or in the past. The Start Plans batch makes all Plans with a Start Date of today available to the Planners you selected. The Plan status changes to In Progress.
The Plan becomes read-only and you cannot edit it.
-
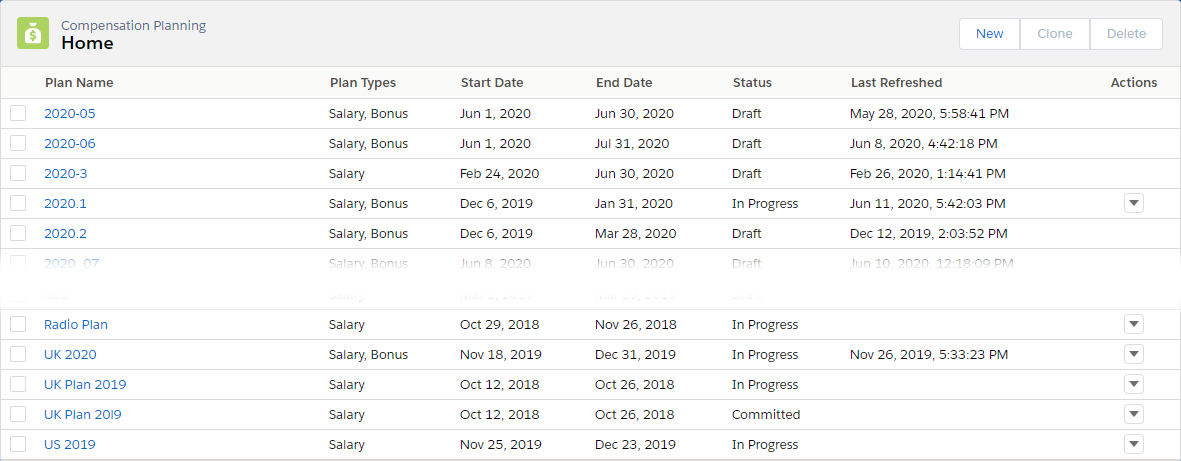
To display a summary of your Plan, select the Plan on the Compensation Planning Home page.
Default Plan fields
Compensation Plans displayed to Planners in WX include a range of default fields, contained in sections for Team, Salary, and Bonus: see Default Plan display in WX.
Planners can control many features of the displayed plan including:
- Changing the order of the displayed fields.
- Choosing which fields to display or hide.
- Pinning fields in a non-scrolling area.
- Filtering the Plan display based on the values of some fields.
See Change your Plan view in WX
Plans are displayed to Planners using one line for each Team Member. The WX display includes:
- Overall Plan values at the top of the Plan.
- A Team section if the Plan includes child Plans for direct reports who are also Planners. The Team section includes total values for their teams - sums of values entered in the Planner's child Plan for each Team Member. Values for child Plans are updated dynamically, so a Planner viewing a parent Plan while child Plans are being updated sees the values changing.
- Lines for Team Members who are not Planners, with values for the Team Member.
During set up, you can select additional fields to display for Planners from a subset of those in the Team Member and Employment Record objects. By default, additional fields are displayed in the order you select, and immediately after the Team section. Planners can tailor their own Plan views to move or hide the default additional fields: see Change your Plan view in WX.
View the Plan Summary page
You can display a Plan Summary for all Plans beyond draft status. To display a summary of your Plan:
-
Select the Compensation Planning tab.
Sage People displays the Compensation Planning Home page.
-
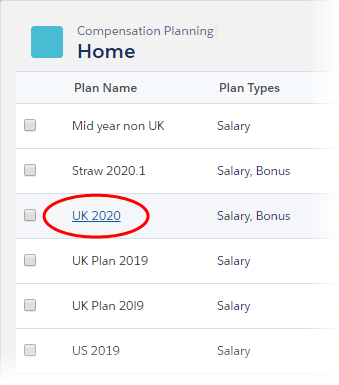
On the Home page select the Plan Name:
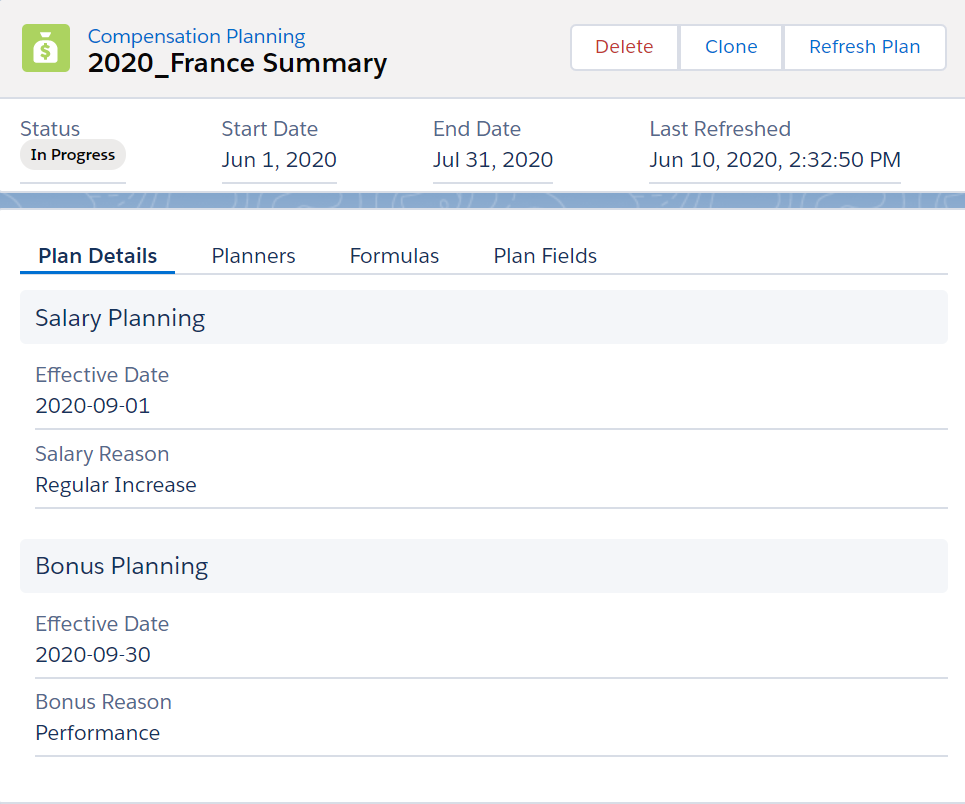
Sage People displays the Plan Summary page:
The page includes a head area with top level information about the plan. Further information about the Plan is displayed under Plan Details, Planners, Formulas, and Plan Fields tabs.
Page head
| Field | Description |
|---|---|
| Plan Status |
|
| Start Date | Date when the Plan becomes available for Planners in WX. |
| End Date | Date after which the Plan is no longer available for Planners in WX. |
| Last refreshed Date | Date the Plan was last refreshed. |
| Button: Delete | Selectable for Plans in Draft, In Progress, Ready, Submitted, or Approved status. |
| Button: Clone | Selectable for Plans in any status. |
| Button: Refresh Plan | Selectable if the Plan is In Progress. Pulls the latest values into the Plan. |
Further information about your Plan is displayed under Plan Details, Planners, Formulas, and Plan Fields tabs.
Plan Details
Information relevant to the type of Plan.
For Salary Planning:
|
Field |
Description |
|---|---|
| Effective Date | Date when the salary award takes effect. |
| Salary Reason | Default reason for salary awards made through this Plan. For example, Regular increase, Promotion. Available values are stored in the Change Reason picklist field on the Salary object. |
For Bonus Planning:
| Field | Description |
|---|---|
| Effective Date | Date when the bonus award takes effect. |
|
Bonus Reason |
Default reason for Bonus awards made through this Plan. For example: Performance, Commission. Available values are stored in the Reason picklist field on the Bonus object. |
Planners
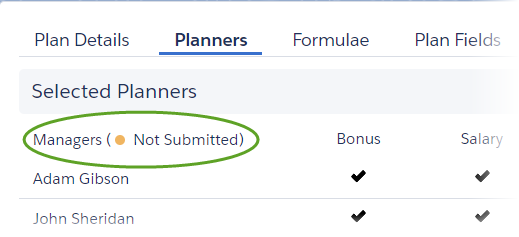
The Top Planner and Planners selected for this Plan with checkboxes indicating the Plan Type(s) available to each Planner. The list includes an indicator against Planners who have not yet submitted their Plans.
|
Field |
Description |
|---|---|
| Top Planner | Name. |
| Selected Planners |
Manager name. Not submitted indicator: Plan type. |
Formulas
Formulas used in your Plan. If a formula type, for example Bonus Exclusion, is not used, the field displays Not Set.
|
Field |
Description |
|---|---|
| Salary Projection (for Salary Plans) |
Formula Field Label. |
| Salary Exclusion (for Salary Plans) |
Formula Field Label. |
| Salary Eligibility (for Salary Plans) |
Formula Field Label. |
| Bonus Projection (for Bonus Plans) |
Formula Field Label. |
| Bonus Exclusion (for Bonus Plans) |
Formula Field Label. Formula Summary - the Help Text entered for the bonus exclusion formula field. API Name of the bonus exclusion formula field. |
| Bonus Eligibility (for Bonus Plans) |
Formula Field Label. Formula Summary - the Help Text entered for the bonus eligibility formula field. API Name of the bonus eligibility formula field. |
Plan Fields
Fields added to your Plan in addition to the default fields. If no fields were added, this tab is empty.
|
Field |
Description |
|---|---|
| Team member fields... | Fields from the Team Member object added to your Plan for display on the planning worksheet. |
| Employment Record fields... | Fields from the Employment Record object added to your Plan for display on the planning worksheet. |
Clone a Plan
Cloning a Plan copies the settings in the original Plan. Any settings deleted since the original Plan was created are not copied. You can clone a Plan in any status. You can clone only one Plan at a time.
Cloning from the home page
-
Select the Compensation Planning tab.
-
Select the checkbox beside the Plan you want to clone.
-
Select Clone
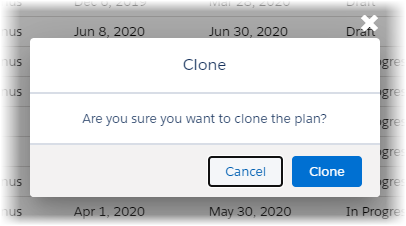
Help Center Home asks you to confirm:
- Select Clone to confirm. The copied Plan is listed on the Compensation Planning Home page with Draft status.
- Select the Plan name to open it and make any changes you need. You can rename the Plan to remove the Copy prefix.
The following values are copied:
- Plan Name
- Start Date and End Date
- Plan Type
- Effective Date and Effective Date Planner override setting
- Any additional selected fields for display on the Plan
- Depending on the Plan type, Salary, Bonus or both Projection Formulas
- Selected Planners
- Select Save & Next.
Cloning from the Plan Summary page
If you clone a Plan from the Plan Summary page you can check the Plan settings before cloning:
-
Select the Compensation Planning tab.
Sage People displays the Compensation Planning Home page.
-
On the Home page select the Plan Name.
Sage People displays the Plan Summary page.
-
On the Plan Summary page select Clone:
Sage People asks you to confirm.
-
Select Clone to confirm.
The copied Plan is listed on the Compensation Planning Home page with Draft status.
Refresh a Plan
If you make changes to:
-
Team Member
-
Salary or Bonus Records
-
Projection, eligibility, or exclusion formulas
...you can pull the updated information into Plans with status In Progress.
For changes made to the Salary or Bonus Eligibility formulas assigned to the Plan, if the change means:
-
A Team Member becomes eligible for a Salary or Bonus award
Refresh adds them to the Plan as an eligible Team Member.
-
A Team Member ceases to be eligible for a Salary or Bonus award
Refresh marks them as ineligible and Planners are unable to enter new values for that award type.
For changes made to the Salary or Bonus Exclusion formulas assigned to the Plan, if the change means:
-
A Team Member becomes excluded from a Salary or Bonus award
Refresh removes them from the Plan.
If the Team Member was a Planner, their direct reports are passed to the one-up Planner.
-
A Team Member becomes included for a Salary or Bonus award
Refresh adds them to the Plan.
If the Team Member is a Planner, Refresh does not add them as a Planner.
To refresh a plan:
- Select the Compensation Planning tab.
-
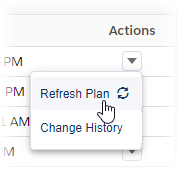
Expand the Actions drop-down menu beside the Plan you want to refresh and select Refresh Plan:
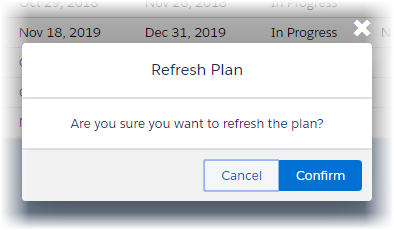
You are asked to confirm:
- Select Confirm.
You can also select Refresh Plan from the plan Summary page; see View the Plan Summary page
View Plan history
You can view changes made to a Plan except changes made to Salary Reason. All other changes are recorded from when the Plan was first made available to Planners. The Change History page shows the most recently requested Plan values.
- Select the Compensation Planning tab.
-
Expand the drop-down menu for the Plan you want to view and select Change History:
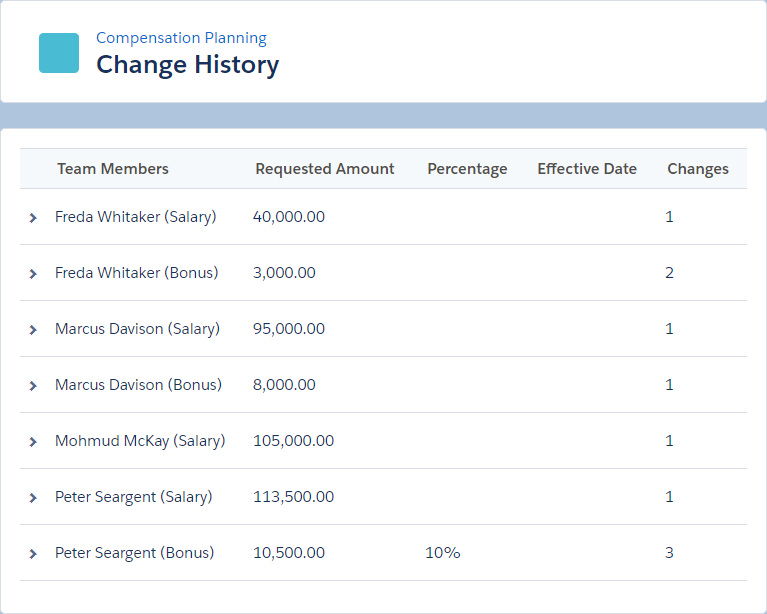
Sage People displays the Change History page for the Plan:
Change History columns
-
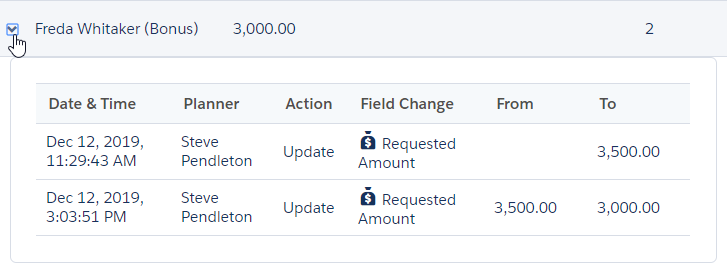
To view change details for a Team member, select the Expand arrow beside the Team Member's name:
-
To view changes for Team Members reporting to a Planner on your team, select the Expand icon beside the Planner's name.
Change History Details columns
| Column | Description |
|---|---|
| Team Members |
Team Member affected by the change. Plan type, Salary or Bonus, is indicated after the Team Member's name. If a Plan includes both Salary and Bonus and changes have been made to both salary and bonus values for a Team Member, the Team Member has two lines in the Change History, one for Salary, one for Bonus. |
| Requested Amount | The most recently requested salary or bonus. If there is no requested salary, this column is blank. |
| Percentage |
Displayed if changes were made to the percentage value by the Planner. If changes were made to Requested Amount and percentage values were calculated by the system, this column is blank. For a Salary: The percentage difference between the current salary and requested salary. For a Bonus: The percentage value of current salary to be paid as a bonus award. |
| Effective Date | The Effective Date entered by a Planner. If the Effective Date has not been modified by a Planner, this column is blank. |
| Changes | The number of changes made to the Plan for each Team member line. |
| Column | Description |
|---|---|
| Date & Time |
When the change was made. |
| Planner | Planner who made the change. |
| Action | Change type. |
| Field Change |
Field showing a changed value. |
| From | Original value of the field. If this is the first change made to the field, this column is blank. |
| To | New value of the field. |
Delete a Plan
Deleting a Plan deletes all the planning data it contains. You cannot restore a deleted Plan.
You can delete a Plan with status:
-
Draft
-
Ready
-
In Progress
-
Submitted
-
Approved
You can delete several Plans at once.
You cannot delete a Plan with status:
-
Committed, or a partially committed Plan.
- Select the Compensation Planning tab.
- Select the checkboxes beside the Plans to delete.
- Select Delete and Delete.
Plan notifications
Automated notifications are generated and sent when actions are taken and a plan passes through the stages of the Compensation Planning process. These notifications are hard coded in the system and are not generated by Action Events or Workflows and they do not use email templates. You cannot stop notifications from generating or sending.
Notifications use custom labels to build their content, enabling you to modify and localize the detail of the messages they contain.
For each action triggering a notification, this section includes:
-
A description of purpose.
-
Custom label names and default values included in the notification.
You can focus the Custom Labels display by creating a view with Categories contains compensation and Short Description contains email.
Action: Submitted
Email sent to the top planner assigned to a plan. Includes the name of planner who submitted and the number of remaining plans to be submitted before the top planner can submit the overall plan.
|
Custom label name |
Custom label default value |
|---|---|
|
Submit_Email_Intro |
{0} has submitted their plan. |
|
Submit_Email_Outstanding_Planners |
The following Planners have Plans outstanding |
|
Submit_Email_No_Outstanding_Planners |
No Plans are outstanding – you can now submit your Plan. |
Action: Commited
User email
Email sent to the user who committed the plan. includes salaries not committed because they are subject to conditions such as pending HR Requests or future-dated salary records.
| Custom label name | Custom label default value |
|---|---|
|
Salary_Conflict_Email_Subject |
Conflicts were detected between Compensation Planning output and other future-dated salary awards or pending HR Requests. No new Salary Records were created for Team Members with conflicts. |
|
Salary_Conflict_Email_Intro |
Conflicts were detected between Compensation Planning output and other future-dated salary awards or pending HR Requests. No new Salary Records were created for Team Members with conflicts. |
|
Salary_Conflict_Email_Pending_HR_Requests |
The following Team Members have pending HR Requests affecting their salary: |
|
Salary_Conflict_Email_Pending_Salaries |
The following Team Members have future-dated Salary Records: |
|
Salary_Conflict_Email_Outro |
Please investigate and resolve conflicts as necessary, then re-run the batch to commit the changes. |
Planner email
Emails sent to all planners. For each planner the email includes their team members who have new salary or bonus records created.
| Custom label name | Custom label default value |
|---|---|
|
Plan_Committed_Email_Subject |
Plan Committed |
|
Plan_Committed_Email_Body |
Your {0} plan has been committed. |
|
Plan_Committed_Email_Body_Bonus |
New Bonus records are being created and will apply from their effective dates for the following team members: |
|
Plan_Committed_Email_Body_Salary |
New Salary records are being created and will apply from their effective dates for the following team members: |
Action: Refreshed
Emails sent to planners who had changes in their plans. Each email includes team members who have changes to their Team Member or Employment Records affecting planning.
| Custom label name | Custom label default value |
|---|---|
| Refresh_Batch_Notification | Please review your Compensation Plan |
|
Salutation This custom label is widely used across Sage People. Editing the value will have an impact beyond Compensation Planning. |
Hi {0}, |
|
Refresh_Batch_New_Projection_Formula |
Your Compensation Planning Administrator has refreshed your Plan {0}. The suggested salary for each of your direct reports may have changed. Please check your Plan to see if further changes are needed. If you have already submitted your Plan, you will need to resubmit it after your changes. |
|
Refresh_Plan_Batch_Intro_Mail |
Your Compensation Planning Administrator has refreshed your Plan {0}. Please check your plan to see if you need to make changes. If you have already submitted your Plan, you will need to resubmit it after your changes. |
|
Refresh_Batch_Changed_Sub_Budgets |
Changes were made to your team budget or to the budget of these Planners on your team. |
|
Refresh_Batch_Team_Member_Changes |
Changes were made to these Team Members. |
|
Thanks This custom label is widely used across Sage People. Editing the value will have an impact beyond Compensation Planning. |
Thanks |
|
Sage_People_Signature This custom label is widely used across Sage People. Editing the value will have an impact beyond Compensation Planning. |
The Sage People team |
Action: Ready to Plan Failure
Email sent to the user who committed the plan when an unexpected data-related error has occurred.
| Custom label name | Custom label default value |
|---|---|
|
Send_Batch_Email_Subject |
{0} failure |
| Send_Batch_Email_Introduction | The {0} has failed for the {1} Plan. The {1} Plan has been reset to Draft status |
|
Salary_Error_Email_Intro_Not_Records_Inserted |
The {0} has failed for the {1} Plan. No salaries have been changed and the {1} Plan has been reset to Approved status. |
|
Salary_Error_Email_Intro_Records_Inserted |
The {0} has failed for the {1} Plan. Some salaries have been changed and the {1} Plan has been set to Partially Committed status. |
|
Plan_Ready_Batch_Error_Email_Intro |
The {0} has failed for the {1} Plan. The {1} Plan has been reset to Draft status. |
|
Refresh_Batch_Error_Email_Intro |
The {0} has failed for the {1} Plan. No changes have been made to the {1} Plan and the Plan status is unchanged. |
|
Batch_Error_Cause |
Cause: {0} |
|
Batch_Error_Message |
Message: {0} |
|
Batch_Error_StackTrace |
StackTrace: {0} |
|
Send_Batch_Email_Outro |
To help find the cause the following information has been sent to Sage People Support: |
Action: In Progress
Notification displayed on screen when the status is changed to In Progress.
| Custom label name | Custom label default value |
|---|---|
| Status_in_Progress | In Progress |
